четверг, 14 июня 2012 г.
303 урока Sony Vegas
braproductions
- How to make COOL INTROS in Sony Vegas + Lots of title effects!
- How to render HD videos for youtube in Sony Vegas THE RIGHT WAY!
- Sony Vegas: How to make AMAZING Intros + Twitch/Wiggle effects!
- 3-Step Guide on editing/rendering your Videos!
- Explosion FX in Sony Vegas!
- Cool intros in Sony Vegas! – Version 2
- PIP (Picture In Picture) in Sony Vegas!
- Robot Voice Effect in SONY VEGAS!
- How to make the chipmunk voice effect in Sony Vegas + How to make creepy low voices!
- Sony Vegas: AWESOME 300-like/smooth SLOW MOTION! + Much more!
CbMRuLeZz77
- Sound Editing in Sony Vegas 8.
- How to blur out a face in Sony Vegas
- Sony Vegas Tutorial: Crystal Text(COOL INTRO AND OUTRO)
- How to upload videos HD with sony vegas
- Sony Vegas Tutorial: How to add and edit music for your videos!
- Sony Vegas Tutorial: How to make 3d(lightning) text!
- Sony Vegas Tutorial- Basics of The Credit Roll
- Sony Vegas Tutorial: How to make a really cool text effect intro(icy)
- Sony Vegas Tutorial: How to make a really cool text effect(Foggy)
- How to make a video lay beneath text(the easy way) using Sony Vegas!
- How to make a clone in Sony Vegas!
- Reversing clips and Zooming in on Clips using Sony Vegas
- How to make a basic text intro using sony vegas!
- How to make a basic watermark using Sony Vegas
- The solution to when your timeline disappears in Sony Vegas.
- Tutorial: Speed up and Slow down Video Editing; with pitch changes!…
cmpmstudios
- Sony Vegas Tutorial – How to make an iPod commercial
- Sony Vegas Tutorial – Teleport Effects
- Sony Vegas Tutorial – Falling Out of the Sky
- Sony Vegas – How to Make a Clone
- Sony Vegas – How to Add Muzzle Flashes and Gunfire
- Sony Vegas -PIP – Picture in Picture
- Sony Vegas – Light Sabers
- Sony Vegas – Hologram Effect
- Sony Vegas Tutorial – Freezing Time and Sound Pitch
- Robot Voice and Echo Effect in Sony Vegas
- Sony Vegas Tutorial – Bluring Face
- HD Widescreen Setting in Sony Vegas Pro 9.0
dillonp23
EpidemicTutorials
- Keyframing in Sony Vegas (Part 1 | The Basics of Keyframing in Sony Vegas
- Keyframing in Sony Vegas (Part 2 | Utilizing Keyframes to Create Animated
- The Basics of Panning/Cropping in Sony Vegas
- How to Properly Render Your Video Using Sony Vegas Pro 8 For HD Quality
- The Basics of Sony Vegas- Interface of its Style and Buttons
- Sony Vegas Tutorial- Basic Keyframing
- Sony Vegas Basics Tutorial
KareemDaDreamFx
- Sony Vegas – Setup Variation and Lag Tips
- Sony Vegas – Rendering Tutorial
- Sony Vegas Tutorial – Flaussian Shake
- Masking – Sony Vegas Tutorial
- Gradient Pinch – Sony Vegas Tutorial
- Gradient Pinch Effect – Sony Vegas
- Text Fly By :: Sony Vegas Tutorial
- Sony Vegas :: 3D Text Tutorial
- Sony Vegas Tutorial :: Flash v2 Effect
learningvegas
- How to Apply Composite Levels in Sony Vegas
- Create Handwriting Effect in Sony Vegas Using Bezier Masks
- Using Grids and the Snap Features in DVD Architect
- How to Add Introduction Media in DVD Architect
- Create A Grid Look in Sony Vegas
- How to use the Bezier Mask tool in Sony Vegas Part 1
- How to Cut a Piece of Video out of a Project in Sony Vegas
- How to use the Bezier Mask tool in Sony Vegas Part 2
- How to Create Animated Bullet Points in Sony Vegas
- How to add a Shake Effect in Sony Vegas
- Editing text on timeline in Sony Vegas
- Placing a Voice Over in Sony Vegas
- DVD Architect – How to Make Button’s Fade In
markapsolon
- Video Tips & Tricks ep19: Sony Vegas Pro 9 Tutorial Media Pool Bin …
- Video Tips & Tricks ep18: Sony Vegas Pro 9 Video Capture tools
- Video Tips & Tricks ep14: How to create a logo and video bug for youtube videos & more
- Video Tips & Tricks ep16: Sony Vegas Pro 9 Introduction Tutorial
- Video Tips & Tricks ep12: How to make any video youtube widescreen HD
- Sony Vegas Movie Studio 9 Platinum Review
- Video Tips & Tricks ep21: Sony Vegas Pro 9 Tutorial trimmer window
montagical
- Sony Vegas Tutorial – Keyframing (Part 1 | The Basics)
- Sony Vegas Tutorial – Basic Intro Creation
- Sony Vegas Tutorial – Semi Advanced Keyframing
- Sony Vegas Tutorial – Random Tutorial!
- Sony Vegas Tutorial – My Introduction (A Hands on Look)
- Sony Vegas Tutorial – Cool Tricks & Random Tips
- Sony Vegas Tutorial – Weekly Edit #1
- Sony Vegas Tutorial – Introduction and Beginner Tips! Part 2
- Sony Vegas Tutorial – Introduction and Beginner Tips! Part 1
- Sony Vegas Tutorial – Keyframing (The Lost Video!)
- Sony Vegas Tutorial – Another Basic Intro (Part 2 of 2)
- Sony Vegas Tutorial – Another Basic Intro (Part 1 of 2)
- Sony Vegas Tutorial – Useful Information
- Sony Vegas Tutorial – Weekly Edit #3!
- Sony Vegas Tutorial – Masking! Masking! Masking!
- Sony Vegas Tutorial – Weekly Edit #2
- Sony Vegas Tutorial – Introduction and Beginner Tips! Part 2
- Sony Vegas Tutorial – Introduction and Beginner Tips! Part 1
- Sony Vegas Tutorial – Short Intro Project
- Sony Vegas Tutorial – Chroma Keying/Green Screening
- Sony Vegas Tutorial – Presets
- Sony Vegas Tutorial – Panning/Cropping, Ease In/Out, Zooming
- Sony Vegas Tutorial – Tracks (Layers)
- Sony Vegas Tutorial – Weekly Edit #4 (The Fallen)
- Sony Vegas Tutorial – Simple Intro + Metronome
- Sony Vegas Tutorial – CCE(Circle Color Effect
- Sony Vegas Tutorial – Credits
- Sony Vegas Tutorial – Gradients
- Sony Vegas Tutorial – FAQ
- Sony Vegas Tutorial – Rendering
- Sony Vegas Tutorial – Even More Useful Tips!
- Sony Vegas Tutorial – Cookie Cutting (Part 1)
- Sony Vegas Tutorial – Cookie Cutting (Part 2)
- Sony Vegas – Spediting (speed + edting)
- Sony Vegas Tutorial – Film Effects/Grain
- Sony Vegas Tutorial – Track Motion
- Sony Vegas Tutorial – Text
- Sony Vegas Tutorial – Teleport Effect
- Sony Vegas Tutorial – Holiday Color Extravaganza!
- Sony Vegas Tutorial – Blurring (Gaussian/Linear/Radial)
- Sony Vegas Tutorial – Introduction to Sony Vegas 8!
- Sony Vegas Tutorial – CCE(Circle Color Effect
- Sony Vegas Tutorial – Time Stop/Time Freeze
- Sony Vegas Tutorial – 3D Compositing and Techniques (Part 2)
- Sony Vegas Tutorial – 3D Compositing and Techniques (Part 1)
- Sony Vegas Tutorial – Cloning!
- Sony Vegas Tutorial – Audio, Recording, & Automation
- Sony Vegas Tutorial – Slow/Fast Motion + Pitch Control
- Customizing the Interface in Sony Vegas
- Sony Vegas Interface
- Introduction for the Basic Training Series for Sony Vegas
- .AVI Files not working in Sony Vegas?
- Top 10 Most Asked Questions in Sony Vegas
- Techniques, Tips, and Experimentation in Sony Vegas
- Rendering Your Movie in Sony Vegas
- Keyframing in Sony Vegas (Part 2 of 2)
- Keyframing in Sony Vegas (Part 1 of 2)
- Panning/Cropping in Sony Vegas
- Transitions and Media Generators in Sony Vegas
- Video Effects in Sony Vegas
- Keyboard Shortcuts and Customization in Sony Vegas
- Sony Vegas Tutorial – Light Rays for Dummies
- Sony Vegas Tutorial – Montage Red Fire Effect
- Sony Vegas Tutorial – Eye Effects
- Sony Vegas Tutorial – Masking! Masking! Masking! (Revamped)
- Sony Vegas Tutorial – More Eyeball Fun
- Organizing Your Workspace in Sony Vegas
- Sony Vegas Tutorial – Surround Sound!
- Top 20 Most Asked Questions in Sony Vegas (volume 2?)
- Sony Vegas – Picture in Picture (PiP!)
- Sony Vegas & Photoshop – Watermarks
- Sony Vegas – Epic/Cinematic Intro
- Sony Vegas Tutorial – Sin City Color Effect
ne014x
- SAVFX | Adding Exsplosions In Sony Vegas
- SAVFX Chroma Key Guide
- Muzzle Flash Tutorial Sony Vegas
- SAVFX | Basic Key Framing
- SAVFX: Sony Vegas Keyboard Shortcuts
- SAVFX Editing Tips (Adjusting Speed)
- Easiest Way to generate TEXT – Sony Vegas How to SAVFX ep2 p
- SAV FX EP3 Pt2 Text – Scrolling Text in Sony Vegas
- SAV FX EP2 Pt2 Playing with Text – Light Ray Text
- SAV FX EP2 Pt1 Playing with Text – Crystal text
- How to blur out a face (Sony Vegas)
- Re: How to blur out a face
- Formating for Television – A quick howto
- Color Pass | A how to in Sony Vegas
- Quick Tips – Sony Vegas Users
- Createing Muzzle Flashes Tutorial
- How to Split Screen in Sony Vegas
- How to Watermark Your Videos (Sony Vegas)
prankster163
guerillabill
- Adding Sound Effects and Audio controls to Sony Movie Studio
- Widescreen from normal width video on YouTube
- Using volume envelopes in Sony Vegas Movie Studio
- Solve Pan & Crop problem in Sony Vegas Movie Studio
- Video overlay in Sony Vegas Movie Studio
- Editing with Sony Movie Studio / Vegas Video
- Sony Vegas Movie Studio HD widescreen settings for YouTube
- Capture HD video w Canon HV30 HV20 Sony Vegas Movie Studio
- Canon HV20 HV30 settings in Sony Movie Studio
- Fred voice effect in Sony Vegas Movie Studio using voice pitch shift
- Auto Ripple in Sony Vegas & Movie Studio
- Creating the moving mouth effect in Sony Vegas Pro
- Pan and Crop Sony in Sony Vegas Movie Studio
- Multi video track editing in Sony Vegas & Movie Studio
- Importing video from DVD into Sony Vegas Movie Studio
- Zoom into a photo in Sony Vegas or Movie Studio
- Secret to great chromakey with Sony Vegas Movie Studio
- Solving the media offline problem in Sony Vegas
- Slow motion / fast motion in Sony Vegas / Movie Studio
- Sony Vegas Movie Studio Editing Tips – split video, ungroup
- Speed up / slow down video in Sony Vegas
- DVD Architect – creating DVD Menus
- Creating green screen chromakey with Sony Vegas Movie Studio
- Add text titles in Sony Vegas & Movie Studio
- Adding a watermark or video bug logo in Sony Vegas
- YouTube settings for Sony Vegas Movie Studio
- title animation in Vegas Video & Sony Movie Studio
- Split Screen and Picture in Picture in Sony Vegas
- remove unwanted noise from audio / video Audacity Sony Vegas
- Chromakey with Sony Vegas Movie Studio+DVD
- Setting Project Properties in Sony Vegas & Movie Studio
- Save a snapshop of any video frame in Sony Vegas
- Creating a photo slideshow in Sony Vegas Movie Studio
- Using Color Corrector in Sony Vegas Movie Studio
- Change Timeline placement in Sony Vegas
- Fix screen layout problems in Sony Vegas & Movie Studio
- Finding lost windows in Sony Vegas & Movie Studio
- Sony Vegas Movie Studio External Drive settings
- Using the Sony Movie Studio audio equalizer to sweeten audio
- Optimize disk settings in Sony Vegas & Movie Studio
- Horizontally flip video in Sony Vegas Movie Studio
richw4
- Teleport wormhole effect – Sony Vegas Tutorial
- Muzzle Flashes – Sony Vegas Tutorial
- Make a green screen using your TV
- Predator Invisibilty Chrome liquid effect – Vegas Tutorial
- Demon Face Vegas Tutorial
- Editing Sound – Sony Vegas Tutorial
- Explode or blow up almost anything in Vegas!
- Light saber / laser tutorial – Sony Vegas Pro
- Exploding Head – Sony Vegas Tutorial
- Youtube HD Widescreen Render Setting – Sony Vegas Tutorial
- Ghostly Poltergeist effect…Sony Vegas Tutorial
- Attention Grabbing on Youtube
- No Green Screen ? Try Split Screen. Vegas 6 Tutorial
- Simple Backgrounds and Animation in Sony Vegas 6
- No Green Screen? Try Masking.. tutorial using Sony Vegas 8
- Sony vegas Tutorial.. blowing a hole in my body
- Simple green screen Tutorial. Chroma key in Sony Vegas
- Creating a Hologram in Sony Vegas
- Freezing Time Tutorial with Sony Vegas
- Rendering for quality Sony Vegas Tutorial
- Falling Out of The Sky Sony vegas Tutorial
- Creating an Alien – Sony Vegas Tutorial
Sefearion
- Sony Vegas & WoW Model Viewer Tutorial (part1)
- Sony Vegas & WoW Model Viewer Tutorial (part 2)
- Sony Vegas Tutorial Resolution
- Working With Multiple Layers
- Working With Moving Footage
- Sony Vegas – “Tutorial” (for want of another word) Marking & …
- Weather Tutorial Part 1
- Common Question
- Information Part 1
- Shadow Tutorial Part 1
- Fog Tutorial Part 1
- Project Memory 2
- Animation Linking Part 1
- Voice Editing Tutorial 2
- Warcraft Sound Effects (Part 1)
themadcowmoo
- Sony Vegas Tutorial – Photographic Intro Effect Part 1 of 2
- Sony Vegas Tutorial – Photographic Intro Effect Part 2 of 2
- Sony Vegas Tutorial – Side By Side Videos aka Split Screen
- Sony Vegas Tutorial Pixelating or Bluring Peoples Faces and Objects
- Sony Vegas and After Effects Welded Logo
- Sony Vegas Tutorial – Missing Windows and Panels
- Sony Vegas Tutorial Picture in Picture
- Sony Vegas Tutorial Adding Credits or Credit Rolls
- Sony Vegas Tutorial Watermarks or Logos
VASSTTraining
vegasediting
- Sony Vegas Pro 8 Free Tutorial #1 Overview Part 1
- Sony Vegas Pro 8 Free Tutorial #1 Overview Part 2
- Sony Vegas Pro 8 Free Tutorial #1 Overview Part 3
- Sony Vegas Pro 8 Tutorial #2 Customize Toolbar – G. Kleiner
- Sony Vegas Pro 8 Tutorial #3 Customize Keyboard G. Kleiner
- Sony Vegas Pro 8 Tutorial #4 Digital Signage – Gary Kleiner
- Sony Vegas Pro 8 Tutorial #5 Time Selections – Gary Kleiner
- Sony Vegas Pro 8 Tutorial #6 Markers – Gary Kleiner
- Sony Vegas Pro 8 Tutorial #7 Audio Envelopes
- Sony Vegas Pro 8 Tutorial #8 Keyframing an Effect
- Sony Vegas Pro 8 Tutorial #9 Keyframe Smoothness
- DVD Architect Button Thumbnails, Frames and Masking – Gary Kleiner
- Sony Vegas Pro 9 new Edit Tools – Gary Kleiner
- Sony Vegas Pro 9 new audio adjustment feature – Gary Kleiner
xPwahaha
Sony Vegas Pro 10 Tutorial
urchased CD tutorials load almost instantly and have higher sound &
video quality. For tutorial support see left
Introduction
 Introduction
System Requirements
Installation Overview
Main Window
Toolbar and Time Display
Ruler and Marker Bar
Command Bar
Track List and Timeline
Transport Bar Controls
Status Bar and Scrub
Controls
Getting Started
New Project
Saving a Project
Renaming a Project
Rotated Projects
Video Properties from Media
Files
Previewing Media Files
Project Media Window
Importing Media
Adding Media to Timeline
Different Types of Media
Continued Workflow
Using the Device Explorer
Files and Events
Moving Events on the
Timeline
Working with Tracks
Nesting Projects
Playing the Project
Scrubbing
Media Player Preview
Prerendering
Rendering and Publishing
Introduction
Introduction System Requirements Installation Overview Main Window Toolbar and Time Display Ruler and Marker Bar Command Bar Track List and Timeline Transport Bar Controls Status Bar and Scrub
ControlsGetting Started
New Project Saving a Project Renaming a Project Rotated Projects Video Properties from Media
Files Previewing Media Files Project Media Window Importing Media Adding Media to Timeline Different Types of MediaContinued Workflow
Using the Device Explorer Files and Events Moving Events on the
Timeline Working with Tracks Nesting Projects Playing the Project Scrubbing Media Player Preview Prerendering Rendering and PublishingHow to Render High Quality Video for YouTube and Vimeo from Sony Vegas Pro This tutorial explains my method for encoding high quality video for
Sony Vegas Pro
10.0c 32-bit used at time of writing, but this workflow is fine with
older versions such as 8.0c. I'm assuming you already have Sony Vegas
Pro (or other Windows NLE such as Adobe Premiere Pro) installed.
An unofficial 64-bit version ported by Victor T. is available in exchange for a donation, but users of 64-bit Vegas Pro have reported that the 32-bit version is working for them.
For further help with installation, visit the Frameserver discussion group or the Sony Vegas Pro forum.
During installation of version 2.10 in Sony Vegas Pro 10.0c I ticked Sony Vegas Plugin.
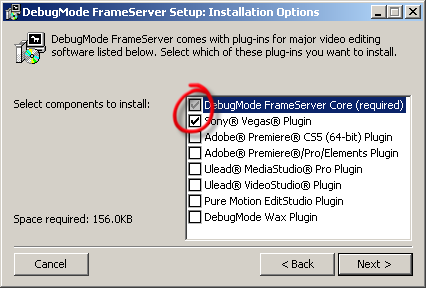
Then I accepted the default settings as follows:

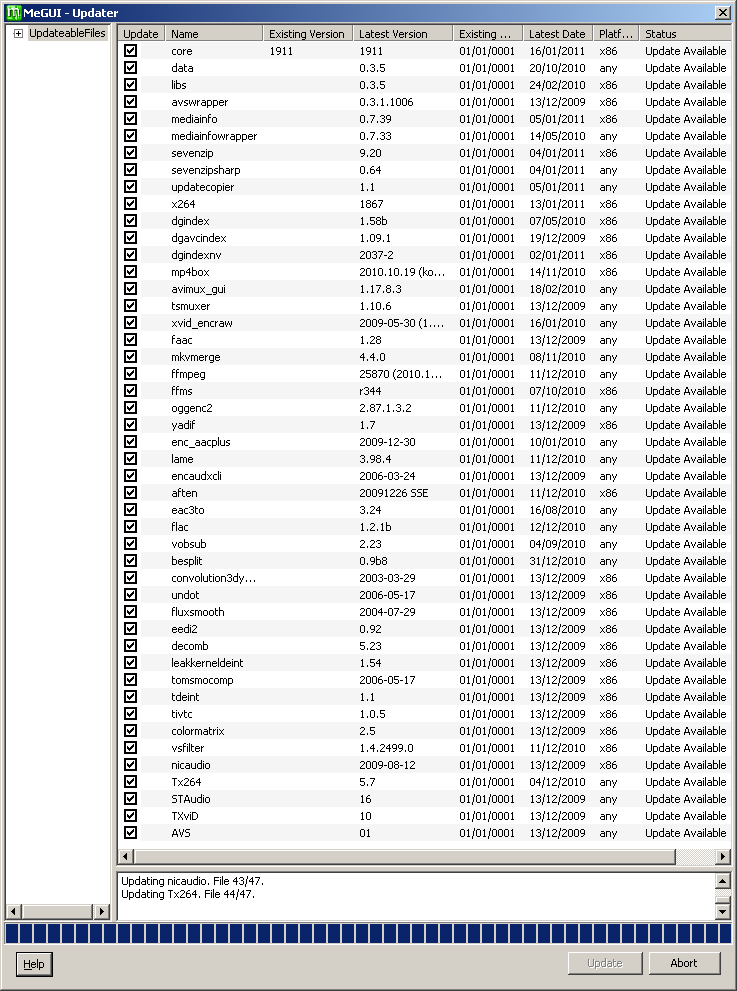
Run MeGUI.exe. After MeGUI opens you should get an update prompt.

Click Yes to review the available updates. The first time you run MeGUI, most of these are not really updates at all, but the files such as the x264 encoder that MeGUI requires in order to work. They are installed in the MeGUI folder and I have never found any conflicts between these files and versions of the same files you might have installed elsewhere on your system. Select all and click Update.
Part-way through the update process you should be prompted for the missing Nero AAC Encoder. This is a separate download from MeGUI.

Click Yes and your browser should open at the download page for the Nero AAC codec. At this point the MeGUI Preset Importer window will also open. Keep this open for now but minimise it or drag it out of the way. We'll come back to it in a moment. Also keep the half-completed MeGUI - Updater window open. Lots going on at the same time here but keep cool!
On the Nero AAC web page you are required to enter an email address. I never receive email from Nero, so I assume they don't send any (or it's getting SPAM-filtered or I successfully unsubscribed in the past if they did). Do not be tempted to use FAAC AAC or LAME MP3 audio instead, especially if you are uploading to YouTube. YouTube has a buggy mp4 demuxer and will mess up your video if your file contains FAAC or LAME audio. Stick with Nero AAC.
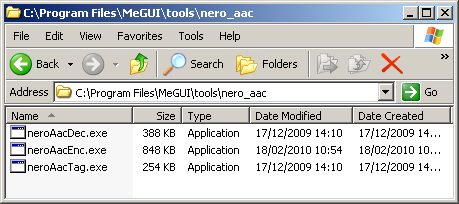
Note that the download from Nero is called NeroAACCodec-1.5.1.zip but actually contains version 1.5.4 (I guess someone forgot to rename it). Make a new folder called C:\Program Files\MeGUI\tools\nero_aac\ and unzip the three files inside the win32 folder to it. At the time of writing I'm using version 1.5.4 of the codec.
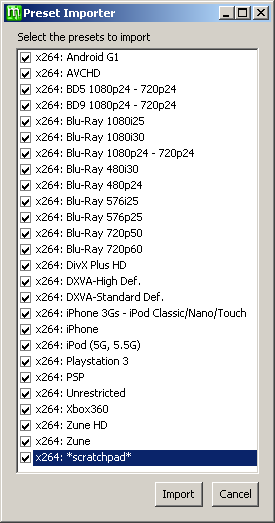
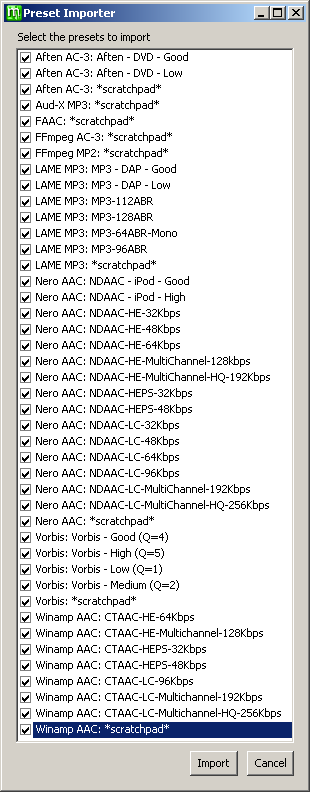
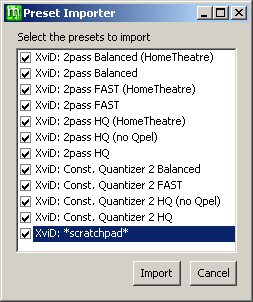
Now go back to the Preset Importer window and choose whichever presets you wish and click Import. I normally take them all for reference and possible future use, but you don't need any for the purposes of this tutorial. It doesn't matter whether you overwrite or skip the *scratchpad* presets when prompted. If no x264 presets are offered then, after the other presets have been imported, download the latest x264 presets from this thread at the doom9.org forum and import them using File > Import Presets.
When MeGUI has finished updating, restart MeGUI as prompted. The location where you put neroAacEnc.exe probably won't match the location that MeGUI expects to find it, so MeGUI may prompt for the file again if it updates during startup. If that happens, just abort the update for now and we'll fix it in a moment.
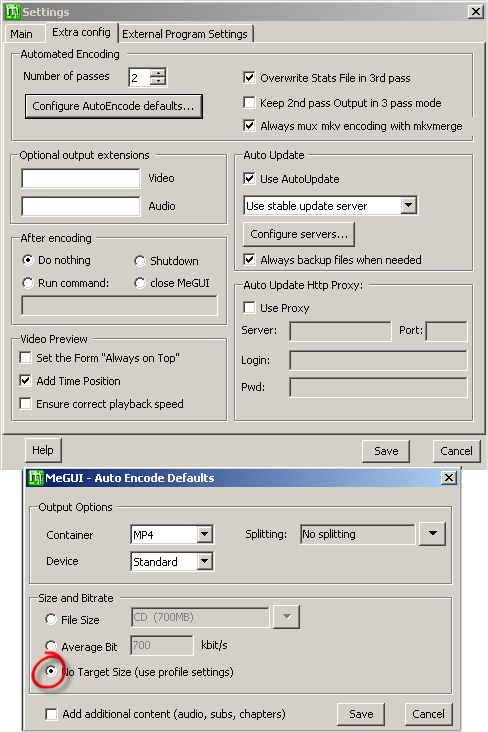
Choose Options > Settings > Extra config > Configure AutoEncode defaults... > No Target Size (use profile settings) then save.
If you leave Use AutoUpdate selected, from time to time MeGUI will offer you updated versions of the files at startup. I have always accepted them when offered, and I have never found anything broken or reduced in quality or speed. I strongly recommend leaving it set at Use stable update server (unless you enjoy playing with fire).
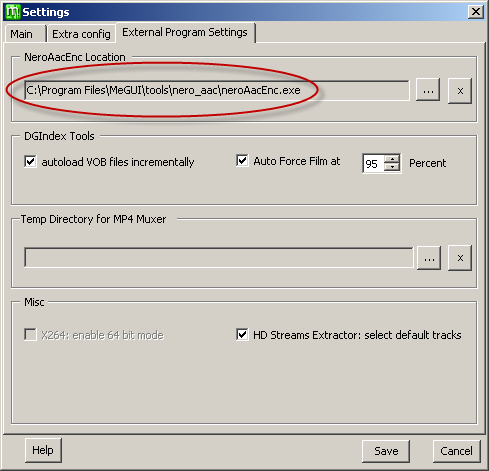
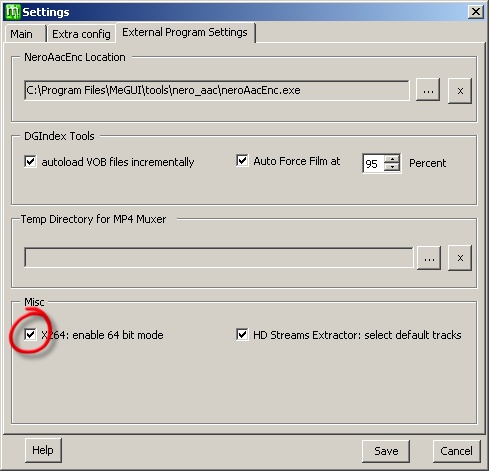
Next we need to tell MeGUI where the Nero AAC encoder executable file is located. In MeGUI choose Options > Settings > External Program Settings and navigate to C:\Program Files\MeGUI\tools\nero_aac\ (where you just put the file) then save.
If you need more help installing and configuring MeGUI, here is another guide. I have not checked its current accuracy.
If your source video is progressive, not interlaced, then you have finished installing and you can now skip to Rendering / Endoding.
Since I first wrote this guide, -Vit- has added a plugins package to the same first post on his forum thread at Doom9.org. This package contains all of the following AviSynth filters and instructions on where to put them. Note that they are for 32-bit use only. The package also contains some plugins for advanced usage of QTGMC that are not required for this guide. It's up to you whether you take the plugins from that package or from the links below (in steps 2.5 to 2.8). It's not a problem to have the extra plugins installed, but it's probably worth you visiting the following pages anyway so you know what you're getting, and if you like your installation as lean as possible then perhaps you'd like to only install exactly the plugins that are required and no more.
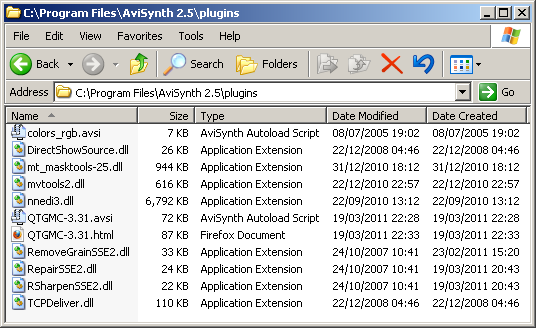
When you have finished, your AviSynth plugins folder should contain these files:
In Vegas Pro choose File > Project Properties.
I am working with HDV 1080-60i, so I started with the HDV 1080-60i (1440x1080, 29.970 fsps) template and then modified it a little:
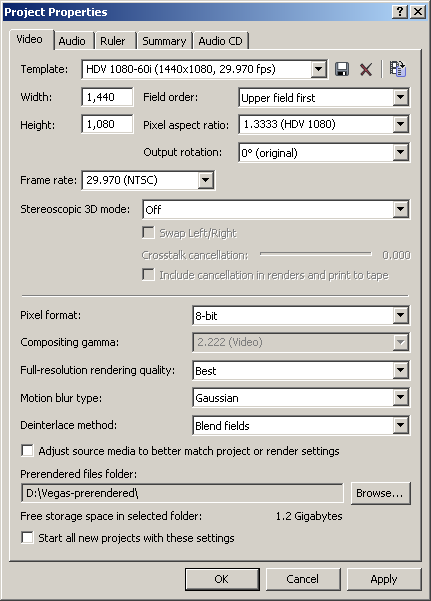
Note there are 3 differences from the Vegas Pro 10 defaults in the HDV 1080-60i (1440x1080, 29.970 fps) template. I have changed Full-resolution rendering quality from good to best. I have unchecked the box (unavailable in earlier versions of Vegas) Adjust source media to better match project or render settings because I like control and I don't want any nasty surprises. And I have also set the Prerendered files folder to D:\Vegas-prerendered\, a new folder that I have made on a different drive from Vegas Pro (C:\) and my video assets (.m2t files and .avi files which are on my E:\ drive). Actually the prerendered files folder is irrelevant to what we are doing now and you can leave it in the default location on C:\ drive if you don't have a separate drive.
Now set the properties on the Audio tab of Project Properties:
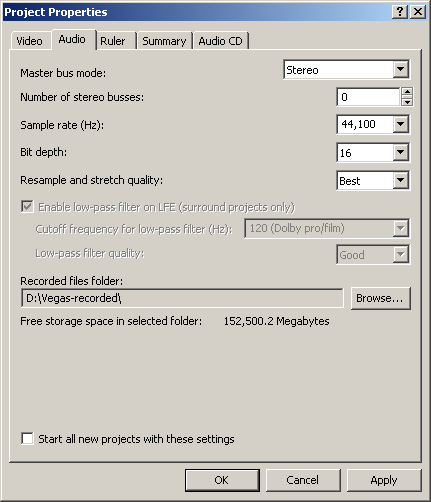
You want to be careful with the sample rate to avoid resampling which will lose some quality. Check the sample rate of the majority of audio in your timeline and match that. If you are mainly using audio that comes off a device such as an HDV or AVCHD camera or ripped from a DVD then you should probably choose 48,000 Hz for the Sample rate (Hz). However if your sound track is dominated by music taken from a CD or the net then choose 44,100 Hz (unless you know it's different) and let any of the 48,000 Hz audio from the camera resample to 44,100 Hz in the mix.
When you are ready to render, choose File > Render As.
File name: I always call it fs.avi and save it in my D:\ drive so I know where it is.
Save as type: Choose DebugMode FrameServer (*.avi) from the drop-down list:
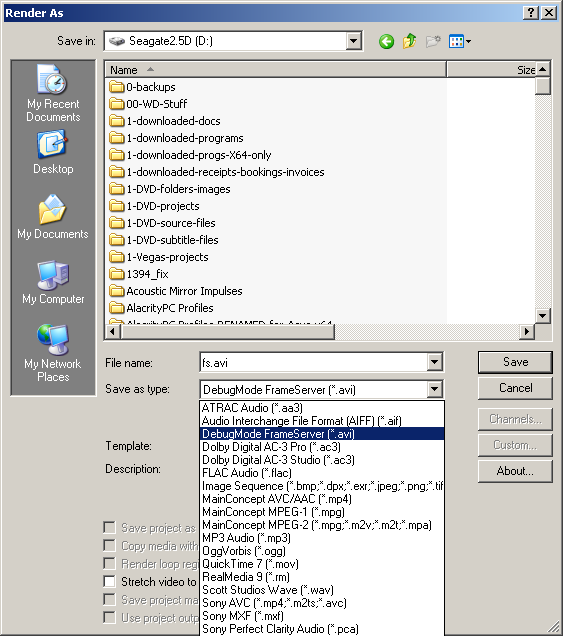
If you only want to render a portion of your timeline then make a loop region on the timeline and tick Render loop region only.
Click Save.

Choose Next and you should see this:

There will now be a file called fs.avi on your drive, but it's only a small file known as a "signpost" file. The Frameserver is a very clever piece of software that feeds the data as it's required by the application receiving it. Instead of frameserving the data you could write the video to an intermediate file, but then you will have an extra step, a big file to deal with, and a small loss of quality.
Copy and paste all the following 46 or so lines of text into Notepad or your preferred text editor.
Save it as 1280x720-QTGMC-ST.avs or
similar. This is now an AviSynth script. I normally save my scripts in
the same location as my rendered videos, so in my case I'm saving it to D:\My
Videos\720x1280-for-YouTube-Vimeo\1280x720-QTGMC-ST.avs. The "-ST" part of the filename refers to
"Single-Threaded", so that we can identify it from a more complicated
multi-threaded version of the script that we might try later.
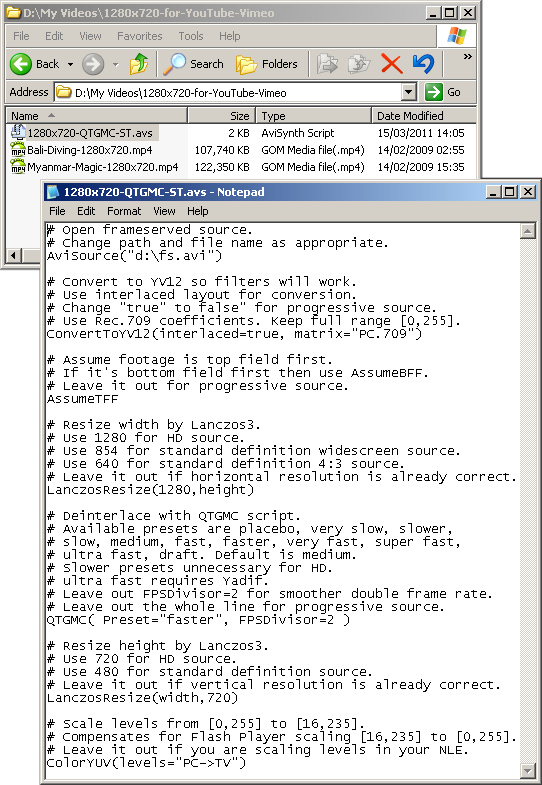
Let's analyse the script piece by piece. Any line beginning with # is ignored when the script runs, so you can use that for comments and to temporarily leave lines out.
AviSource("d:\fs.avi")
Opens your frameserved signpost file. Change the path and filename to whatever you saved it as.
ConvertToYV12
The RGB24 output of Framesever must be converted to YV12 so that the AviSynth filters will work (more info here).
interlaced=true
Tells the Convert operation that the footage is interlaced so that it can convert correctly. If your footage is progressive (not interlaced) then change true to false.
(matrix="PC.709")
Use Rec.709 luma coefficients, which are the standard for HD video, and keep the full range of values [0 to 255] rather than scaling to [16 to 235]. For standard definition video you should use (matrix="PC.601") instead, except if you are encoding for YouTube, who use Rec.709 at all resolutions.
AssumeTFF
Change this to AssumeBFF if necessary. Leave this line out completely if your footage is progressive. My HDV footage is interlaced top field first so I use AssumeTFF. My DV footage is bottom field first so I change this to AssumeBFF. Try either MediaInfo (works for HDV) or Gspot (works for DV) to analyse the field order of your footage.
LanczosResize(1280,height)
Lanczos3 usually offers better quality (fewer artifacts) and a sharper image than the bicubic resizing done by Vegas Pro (more info here). 1080p is more likely to stutter than 720p on many current computers and connections, and at the time of writing Vimeo does not offer 1080p videos. So for HD we are going to resize to 720x1280, which is still HD. For HD use 1280. For widescreen standard definition footage to upload to sharing sites use 854. For 4:3 standard definition footage use 640. It is faster to scale the width before the deinterlacing than after, so this line resizes in the horizontal direction only. If you are self-hosting then try to choose a size from the "Best (16)" columns here or here. Leave this line out completely if the horizontal resolution of your footage is already correct.
QTGMC( Preset="faster", FPSDivisor=2)
Deinterlace using the QTGMC script. Leave this line out completely if your footage is progressive. There are lots of options that you can use with QTGMC but the preset used selects sensible settings for a given encoding speed. The available presets are placebo, very slow, slower, slow, medium, fast, faster, very fast, super fast, ultra fast and draft. The script's default preset is medium, which is good for a standard definition render. For HD, I recommend using faster, very fast or super fast, although you might use medium for a "no compromise" render. Other QTGMC options are very well documented in the QTGMC-3.32.html file in your AviSynth plugins folder. Further reading on the QTGMC thread at Doom9. Leave that line out completely if your footage is already progressive.
FPSDivisor=2 makes QTGMC keep the original frame rate, which is what YouTube and Vimeo require. If you set FPSDivisor=1 (or delete it, since 1 is the default value), you get double the original frame rate because the footage has been bobbed (= fields separated, resized x2 to frame height, and played one after the other). That can be great for offline playback or even self-hosted web videos. Try it some time. I guarantee your interlaced footage has never looked so smooth on a computer screen. You can also use this for great slow motion at 50% of the original speed.
If you want to try QTGMC's ultra fast mode (= lower quality!) then you will need to add the Yadif deinterlacer to your AviSynth plugins folder. I have found that I need to manually load Yadif by adding this line as the first line in my script: loadcplugin("c:\program files\avisynth 2.5\plugins\yadif.dll")
LanczosResize(width,720)
Finally we resize the height of the video using the Lanczos3 algorithm. For HD use 720. For standard definition footage use 480. Or use your chosen resolution for self-hosting. Leave this line out completely if the vertical resolution of your footage is already correct. Note that if your footage is progressive you can actually do the resizing in one line, such as LanczosResize(1280,720).
ColorYUV(levels="PC->TV")
Web browsers' Adobe Flash Player plugin will expand the luminance levels of the video is receives from YouTube, Vimeo, Facebook, JWPlayer etc. from [16,235] to [0,255], thereby increasing the contrast. If you have shadow details in the 0-16 range, these will be clipped to plain black. If you have highlight details in the 235-255 range, these will be clipped to plain white. If you wish to retain these details, this optional line compensates for the luminance expansion in advance by doing exactly the opposite. i.e. A [0,255] to [16,235] conversion. Read more on this page that helps you conform video levels for the web. You should either conform to Studio RGB levels in your NLE or in this AviSynth script, but not both.
One final note... You could leave out the line ColorYUV(levels="PC->TV") and instead use Rec709 in the 2nd line of your script. i.e. ConvertToYV12(interlaced=true, matrix="Rec709". The end result will be very similar. If you are not resizing or deinterlacing in AviSynth then I recommend this to minimize the number of conversions. But if deinterlacing and/or resizing, I prefer to maintain the full range of levels and then "squeeze" them at the end with ColorYUV(levels="PC->TV").

This preview uses Rec601 luma coefficients, so it expands the levels out to [0,255], just like the Flash Player will later. Don't worry, the file rendered by MeGUI will be correct at [16,235]. The preview is unlikely to play smoothly but you can take a look around to see a preview of the result of the deinterlacing and resizing work, then close this window. You can reopen it at any time with the Reopen Video Preview button in the main MeGUI window.
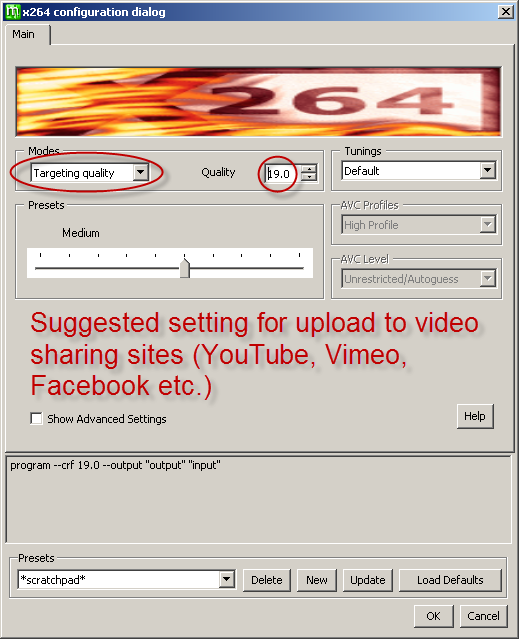
Choose x264: *scratchpad* from the Encoder settings menu.
Then click Config next to it, to open the x264 configuration dialog.
We need to set the bitrate/quality of the video to be appropriate for the intended use. You can target a constant quality, by choosing Targeting Quality from the Modes list in the Main x264 window, but then the bitrate of the video stream in your video will vary, depending on the amount of movement and detail, and uniformity of colour in the video. For example sports video taken with a handheld camera will have a higher bitrate at the same quality setting than a "talking head" or studio interview shot with the camera on a tripod. Slideshows and cartoons generally require even less bitrate. Assuming you have a good internet connection, constant quality is a good setting for uploading videos to sharing sites, where bitrate is not as critical as quality.
The Quality number is known as a constant rate factor, or "crf" number. For a higher quality/higher bitrate choose a LOWER crf number, or vice versa. Yes, that's confusing. For sharing sites we want to upload a video with plenty of bitrate/quality "overhead" so that they can make a good job of the subsequent encode on their server. I suggest you keep the crf between 18.0 and 21.0 unless you have a tiny upload bandwidth. There is not much to be gained by going below 18.0, and the file you have to upload will be bigger. In my tests using the QTGMC faster preset, a crf of 19.0 gives a bitrate of between 4 and 10 Mbps at 1280x720 and around 3 Mbps at 640x480, depending on the detail and movement in the footage.
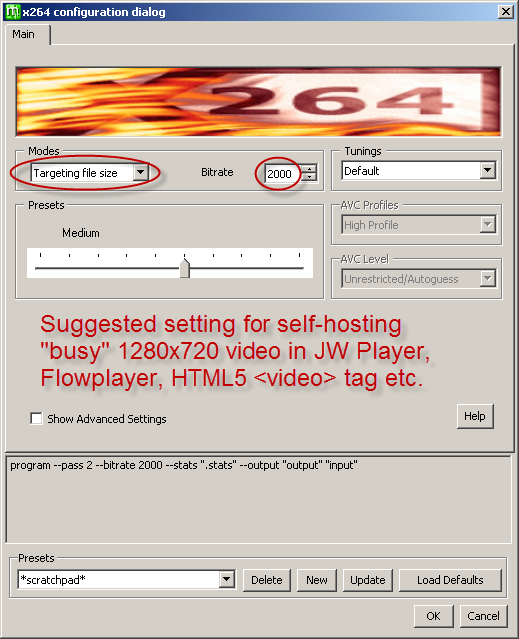
If you are preparing a file to host yourself in a Flash player such as JWPlayer or Flowplayer or in the HTML5 <video> tag then you probably want more control of the bit rate. Choose the Targeting file size mode and then choose the minimum bitrate that gives the desired quality so that buffering time and hosting costs are minimized.
The following table gives suggested bitrates/quality-based crf values depending on the type of video, the resolution and the intended use. Adjust these suggestions according to your own needs.
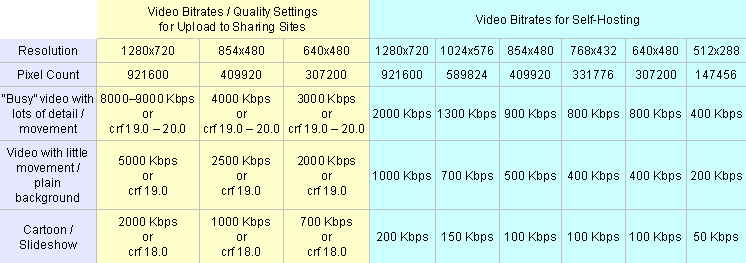
If you have a series of similar videos and you wish to self-host them, you might try determining a quality crf value through trial and error that gives approximately the right bitrate, and then using Targeting quality instead of Targeting file size. But you should still check the file size and/or the bitrate of the rendered videos (try MediaInfo) to make sure they are in the right ball park.
For upload to sharing sites or for playback in a web browser on a PC, the other x264 default settings are fine, although adjusting the Deblocking settings may help in some circumstances (see "Advance Functions" below). If you want to target other playback devices such as phones and tablets then use the appropriate MeGUI presets (and adjust the resize resolution in your AviSynth script according to the device resolution).
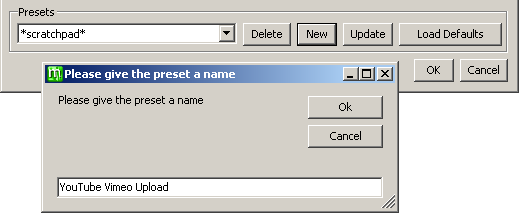
In the Presets section, click New and save the preset with a memorable name that you can choose next time from the Encoder settings pulldown menu in main MeGUI window.
Rendered files should open without problem in Vegas Pro 10.0c. The decoder in earlier versions such as 8.0c is much more choosy. If you really need playback of the file in Vegas Pro 8.0c, check the Show Advanced Settings box then set Adaptive B-Frames to 2-Optimal. This worked for me with MeGUI version 1989 and x264 version 1911 (however in MeGUI version 1911 / x264 version 1867 I had to disable B-Pyramid and P-frame Weighted Prediction instead). Smooth playback in Vegas Pro 8.0c is almost impossible, but the image can be studied in the preview window when the video on the timeline is paused.
Choose Nero AAC: *scratchpad* from the Encoder settings menu.
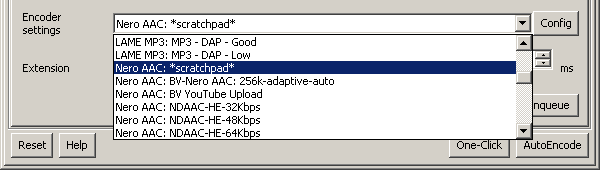
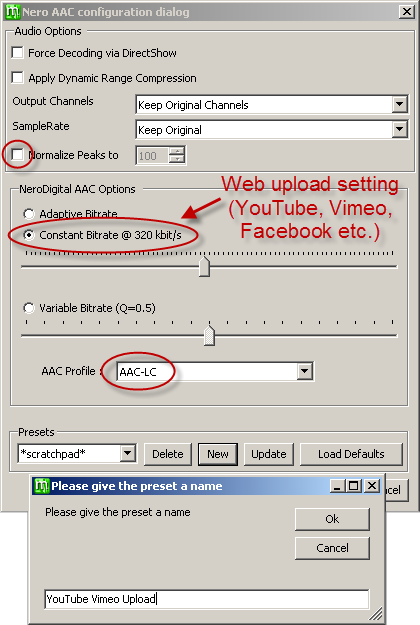
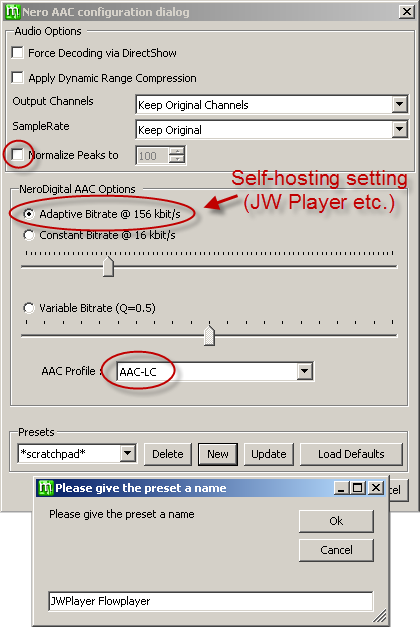
Then click Config next to it to open the Nero AAC configuration dialog. Choose an AAC Profile of AAC-LC (the HE profiles gave me double-speed audio on Facebook). Uncheck Normalize Peaks (I prefer to set audio levels in my NLE).
If you are preparing a file for upload to YouTube, Vimeo, Facebook etc. then choose Constant Bitrate and set the slider to 320 kbit/s. You can use the arrow keys on your keyboard for fine tuning. The video host is going to re-encode your audio to something like 128 or 156 kbps AAC. 320 kbit/s is a high setting for compressed audio, but the video stream of your file is so large that there is no point scrimping on the audio bitrate of the file we send them, so let's give them plenty of quality to work with.
Finally create a new preset for your audio settings, as you did for your video settings.
If you are preparing a file to host yourself in JWPlayer or similar then choose Adaptive Bitrate and set it to 156 kbit/s.
Click the AutoEncode button at the bottom right. The name of the output will default to the same name but with a "-muxed.mp4" suffix. Change this to whatever you want, or accept the default and rename it later.
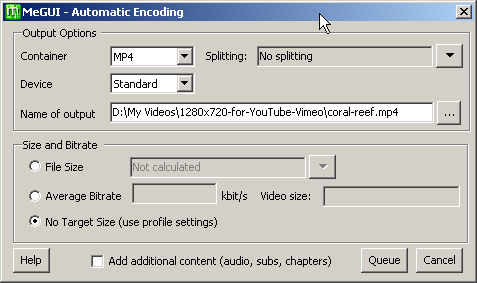
Click Queue and then switch to the Queue tab in the main window. Assuming you are doing a constant-quality render, you should see 3 jobs in the queue. Firstly the Nero AAC audio encode to a .m4a file. Secondly the x264 encode to a .264 file. And finally the mux of those 2 streams into a .mp4 file. If you are doing a 2-pass render for self-hosting then you will see the first analysis pass appear as an extra job.
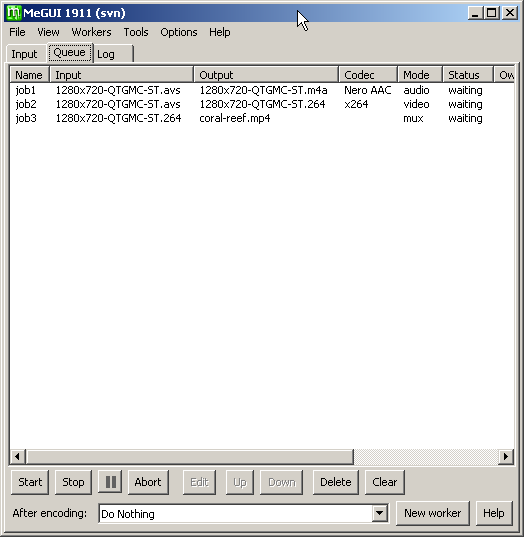
Click Start and the Status window will pop up. The audio encoding and muxing will complete very quickly compared to the video encoding. The Processing rate information is useful for testing your rendering settings (e.g. comparing the speed of QTGMC presets).

When the rendering is complete, the .m4a audio file and .264 video file will be automatically deleted and you will be left with your muxed .mp4 file ready for upload.
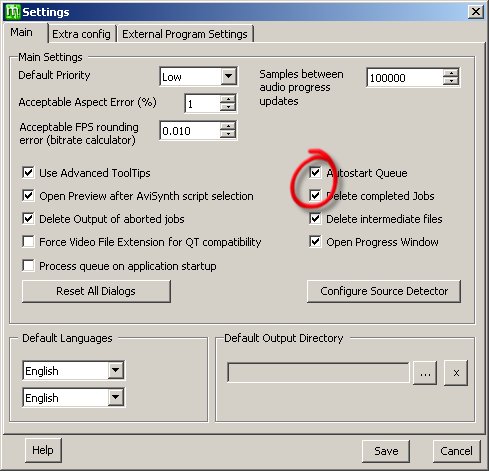
By default, completed jobs remain shown in MeGUI's Queue window. When testing I like to see how long a job took before clearing them with the Clear button. Widen the window to see the FPS (frames per second) column. However once you're "in production" you can check Delete completed jobs in the settings window. You can also check AutoStart Queue to save on clicks, however you would probably not want to do that if you were using MeGUI to batch encode.
When your encode is finished, choose Stop Serving on the Frameserver window and Close the Vegas Pro rendering progress window.
You can get lots of information about the file you just rendered by using Mediainfo (switch to Tree or Text under the View menu). You can also check it by playing it in software such as VLC Media Player. The completed mp4 files play smoothly in Vegas Pro 10.0. In Vegas Pro 8.0 they will open but the video plays very poorly. I have not tried them in Vegas Pro 9.0.
The first way to deal with this is to include a silent Nero AAC audio stream with the video. Mute any unwanted audio in Vegas Pro and then proceed as described above, except I recommend you reduce the Constant Bitrate all the way down to 16 kbit/s in the Nero AAC configuration dialog.
Your second option is to mux with a mkv container instead of mp4 by choosing MKV as the Container in the Automatic Encoding options:
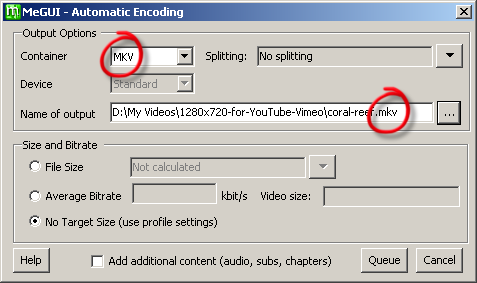
Some people prefer to use mkv rather than mp4 for everything, including videos with audio, and sites like Vimeo and Facebook can also accept them, but the disadvantage is that the file cannot be opened in Vegas Pro for checking. However VLC can play mkv files.
QTGMC needs to know the shutter angle of your source, and the shutter angle that you would like to simulate in the progressive (non-interlaced) output. Shutter angles derive from traditional film cameras which use rotary shutters. The calculations to convert shutter speed to shutter angle for progressive footage can be found here.
Cameras that shoot interlaced footage normally default to a shutter speed of 1/50 at 50i, or 1/60 at 60i, unless they need to speed up the shutter speed because the iris is already as small as it will go. Because of the difference between fields and frames, the whole concept of shutter angle for interlaced footage is rather irrelevant and confusing. However for the purposes of QTGMC we should use the following formula:
ShutterAngleSrc = 360*FramesPerSecond/ShutterSpeed.
Remember we have half as many frames as we have fields. So for example if you have 50i footage with a shutter speed of 1/215, then:
ShutterAngleSrc = 360*25/50 = 180°
1/60 at 60i:
ShutterAngleSrc = 360*30/60 = 180°
In many cases you can use DVMP Pro to view the shutter speed of your captured footage.
Cameras that shoot progressive footage normally default to a shutter speed of 1/50 at 25p, or 1/60 at 30p, which is equivalent to a shutter angle of 180 degrees, but some shooters prefer to use 1/25 at 25p or 1/30 at 30p which is equivalent to a shutter angle of 360 degrees, and means the camera is recording everything it sees over time, not just half.
So, for example, to deinterlace and simulate the motion blur of 1/50 at 25p (i.e. 180 degree shutter angle) from interlaced footage that was shot at 1/215 at 50i, use a line like the following. You could term this "50% motion blur", and is a good setting to try first:
QTGMC( Preset="faster", FPSDivisor=2, ShutterBlur=3, ShutterAngleSrc=180, ShutterAngleOut=360 )
For more information and further settings, consult the QTGMC-3.32.html help file which you unzipped to your AviSynth folder. Also read this post on doom9 by the QTGMC author.
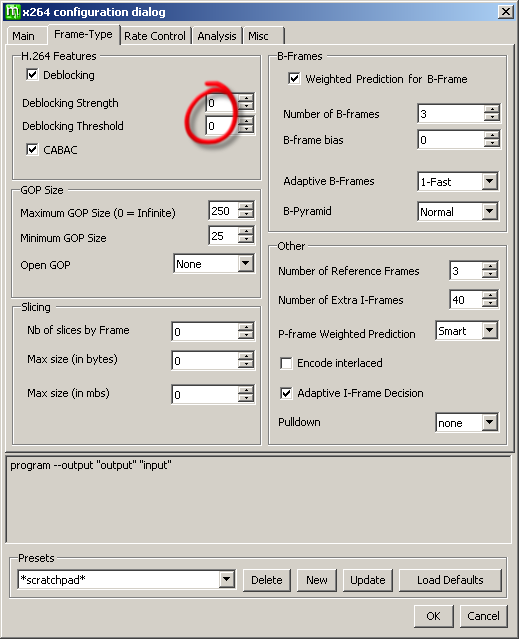
If you do this, keep them both within the range -3 to 2 and keep them both the same or within 1 value of each other. Negative numbers reduce the amount of deblocking and preserve more detail. This will be sharper but will increase the chance of blockiness. Positive values decrease the chance of blockiness but soften/blur the video. You can get away with less deblocking at high bitrates, so for upload to YouTube, Vimeo etc., you could try setting Deblocking Strength to -2 and Deblocking Threshold to -1. For lower bitrates for self-hosting I usually leave them both at 0. More info about x264 deblocking on the doom9 forum. Also, this guide encourages adjusting deblocking settings, whereas this guide generally discourages it. As visual comparisons are very hard to make, I suggest trying it with some extreme settings at first so you know what you are looking for in the rendered video.
There are instructions on how to do this in the QTGMC-3.32.html file in your AviSynth plugins folder, and more discussion in the QTGMC thread at Doom9. A key explanation is in post #389, and there is further key discussion starting here. Optimizing multi-threading is a process of trial and error. According to the author -Vit-, "there are occasional instabilities with multi-threading, because AviSynth is not quite thread-safe. These instabilities affect different users in different ways: some report no issues, others can barely get multi-threading to work at all".
To try it, download and install an "MT" version of AviSynth. First try the most recent SEt's build of AviSynth 2.6. Some have found that it won't open RGB24 format, and that RGB32 is much slower. If so then frameserve in YUY2 format and remove the ConvertToYV12... and ColorYUV... lines from your script. If using AviSynth 2.6, some have surprisingly found that mt_masktools-25.dll still works better than the mt_masktools-26.dll that is also included in the zip download. If your source is YUY2 then you must use mt_masktools-25.dll, regardless of your AviSynth version.
If that multi-threaded AviSynth version gives you stability problems then you could try alternative older multi-threaded builds of AviSynth 2.5.8 here, here, here, or here. Also, here is another discussion thread about achieving multi-threaded stability.
Update: -Vit- has now posted a package of plugins that contain a minor modification that may improve multi-threading stability. Find a link for it in the first post on his QTGMC thread at Doom9.
Start with a script like the following one and call it something like 1280x720-QTGMC-MT.avs to distinguish it from the single-threaded version. The added parts are in orange and you need to change the 3 letters in green according to the instructions in the comments:
If you have success or otherwise with multi-threading, please post
your script and system specs on one of the discussion threads linked
from the end of this tutorial. In my case, I am currently running a
Q6600 quadcore box overclocked to 3200MHz with 4GB RAM and Windows XP
x64. SEt's 2011.09.13 build of AviSynth 2.6 with -Vit-'s modded plugins.
My current settings for speed are as follows, and I am not getting any
crashes:
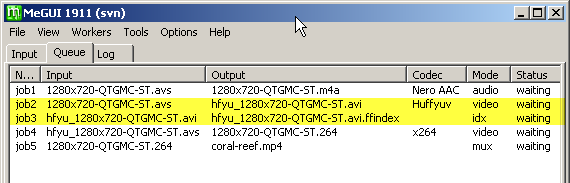
You will see 2 extra jobs in your queue. Firstly the Huffyuv file and secondly an index of that file for use by the subsequent x264 encoding job. The Huffuyv avi file will be written to the same folder as your avs script and will be deleted after completion of the jobs. A short AviSynth script called, for example, hfyu_1280x720-QTGMC-ST.avs will be left behind, and you can delete it.
There is a 64-bit version of MeGUI but it is not recommended yet because not all the tools it uses are available in 64-bit. For the time being just use the 32-bit version.
64-bit AviSynth and its plugins have not been as actively developed as the 32-bit versions. You may encounter some stability issues, but expect this situation to improve rapidly as 64-bit development increases.
This tutorial is discussed on the Sony Vegas forum, dvinfo.net, doom9.org and Vimeo [links coming soon]. If you have questions about this workflow, or if you find errors or improvements, please give me some feedback on one of those discussion threads, or send me an email, especially if you get all or part of the process working with 64-bit or multi-threaded versions of the tools.
2.1 Debugmode Frameserver Installation:
Version 2.10 used at time of writing. Download here. Debugmode Frameserver supports Adobe Premiere Pro and other NLEs besides Sony Vegas Pro.An unofficial 64-bit version ported by Victor T. is available in exchange for a donation, but users of 64-bit Vegas Pro have reported that the 32-bit version is working for them.
For further help with installation, visit the Frameserver discussion group or the Sony Vegas Pro forum.
During installation of version 2.10 in Sony Vegas Pro 10.0c I ticked Sony Vegas Plugin.
Then I accepted the default settings as follows:
2.2 AviSynth Installation:
Version 2.5.8 (32-bit, single-threaded) used at time of writing. Download and run the installer. I accepted the defaults during installation. There are multi-threaded ("MT") and 64-bit versions available. The multi-threaded version can improve deinterlacing speed on multi-core machines, but I recommend getting the process working in single-threaded, 32-bit AviSynth first.2.3 MeGUI / Nero AAC Encoder Installation:
Version 1989 used at time of writing (although some screenshots below are for version 1911). The latest stable release may not come with a Windows installer, it is simply the MeGUI executable and other files. Unzip the contents to a folder such as C:\Program Files\MeGUI\. To make accessing the program easy, right click on MeGUI.exe and choose Send to Desktop and use that, or drag it to your Start menu.Run MeGUI.exe. After MeGUI opens you should get an update prompt.
Click Yes to review the available updates. The first time you run MeGUI, most of these are not really updates at all, but the files such as the x264 encoder that MeGUI requires in order to work. They are installed in the MeGUI folder and I have never found any conflicts between these files and versions of the same files you might have installed elsewhere on your system. Select all and click Update.
Part-way through the update process you should be prompted for the missing Nero AAC Encoder. This is a separate download from MeGUI.
Click Yes and your browser should open at the download page for the Nero AAC codec. At this point the MeGUI Preset Importer window will also open. Keep this open for now but minimise it or drag it out of the way. We'll come back to it in a moment. Also keep the half-completed MeGUI - Updater window open. Lots going on at the same time here but keep cool!
On the Nero AAC web page you are required to enter an email address. I never receive email from Nero, so I assume they don't send any (or it's getting SPAM-filtered or I successfully unsubscribed in the past if they did). Do not be tempted to use FAAC AAC or LAME MP3 audio instead, especially if you are uploading to YouTube. YouTube has a buggy mp4 demuxer and will mess up your video if your file contains FAAC or LAME audio. Stick with Nero AAC.
Note that the download from Nero is called NeroAACCodec-1.5.1.zip but actually contains version 1.5.4 (I guess someone forgot to rename it). Make a new folder called C:\Program Files\MeGUI\tools\nero_aac\ and unzip the three files inside the win32 folder to it. At the time of writing I'm using version 1.5.4 of the codec.
Now go back to the Preset Importer window and choose whichever presets you wish and click Import. I normally take them all for reference and possible future use, but you don't need any for the purposes of this tutorial. It doesn't matter whether you overwrite or skip the *scratchpad* presets when prompted. If no x264 presets are offered then, after the other presets have been imported, download the latest x264 presets from this thread at the doom9.org forum and import them using File > Import Presets.
When MeGUI has finished updating, restart MeGUI as prompted. The location where you put neroAacEnc.exe probably won't match the location that MeGUI expects to find it, so MeGUI may prompt for the file again if it updates during startup. If that happens, just abort the update for now and we'll fix it in a moment.
Choose Options > Settings > Extra config > Configure AutoEncode defaults... > No Target Size (use profile settings) then save.
If you leave Use AutoUpdate selected, from time to time MeGUI will offer you updated versions of the files at startup. I have always accepted them when offered, and I have never found anything broken or reduced in quality or speed. I strongly recommend leaving it set at Use stable update server (unless you enjoy playing with fire).
Next we need to tell MeGUI where the Nero AAC encoder executable file is located. In MeGUI choose Options > Settings > External Program Settings and navigate to C:\Program Files\MeGUI\tools\nero_aac\ (where you just put the file) then save.
If you need more help installing and configuring MeGUI, here is another guide. I have not checked its current accuracy.
If your source video is progressive, not interlaced, then you have finished installing and you can now skip to Rendering / Endoding.
2.4 QTGMC Deinterlacing Script Installation
Version 3.32 used at time of writing. Find the latest version on the forum thread at Doom9.org. Unzip the QTGMC3.32.avsi and QTGMC-3.32.html files to your C:\Program Files\AviSynth 2.5\plugins\ folder (or similar).Since I first wrote this guide, -Vit- has added a plugins package to the same first post on his forum thread at Doom9.org. This package contains all of the following AviSynth filters and instructions on where to put them. Note that they are for 32-bit use only. The package also contains some plugins for advanced usage of QTGMC that are not required for this guide. It's up to you whether you take the plugins from that package or from the links below (in steps 2.5 to 2.8). It's not a problem to have the extra plugins installed, but it's probably worth you visiting the following pages anyway so you know what you're getting, and if you like your installation as lean as possible then perhaps you'd like to only install exactly the plugins that are required and no more.
2.5 MVTools Installation
Version 2.5.11.2 used at time of writing. Download the latest version from here. Unzip and copy mvtools2.dll to your AviSynth plugins folder. (64-bit info)2.6 RemoveGrain Installation
Version 1.0 pre-release used at time of writing. Download it here. If you computer does not already have a program to open .rar files, I recommend IZArc, which is free. Open the .rar file and copy RepairSSE2.dll, RemoveGrainSSE2.dll and RSharpenSSE2.dll to your AviSynth plugins folder. (64-bit info)2.7 MaskTools v2 Installation
Version 2.0a48 used at time of writing. Find the latest version on the forum thread at Doom9.org. The server was offline when I needed it but I found an unofficial mirror here. Unzip and copy mt_masktools-25.dll to your AviSynth plugins folder. (64-bit info)2.8 nnedi3 Installation
Version 0.9.2 used at time of writing. Download from tritical's AviSynth Filters page. Unzip and copy nnedi3.dll to your AviSynth plugins folder. (64-bit info)When you have finished, your AviSynth plugins folder should contain these files:
3. Rendering / Encoding
The terms "AVC", H.264", and "MPEG-4 Part 7" are effectively interchangeable. They refer to the same highly-compressed video format. We are going to upload this format to YouTube or Vimeo, and they are going to compress it again to the same format, but with more compression, and at various resolutions. Alternatively it is the perfect format for hosting yourself in a Flash web player such as JWPlayer or Flowplayer.3.1 Sony Vegas Pro
First of all, check your project properties in Sony Vegas Pro. The settings should be straightforward to mimc in Adobe Premiere Pro. Debugmode Frameserver will use these settings when it transfers the video to AviSynth.In Vegas Pro choose File > Project Properties.
I am working with HDV 1080-60i, so I started with the HDV 1080-60i (1440x1080, 29.970 fsps) template and then modified it a little:
Note there are 3 differences from the Vegas Pro 10 defaults in the HDV 1080-60i (1440x1080, 29.970 fps) template. I have changed Full-resolution rendering quality from good to best. I have unchecked the box (unavailable in earlier versions of Vegas) Adjust source media to better match project or render settings because I like control and I don't want any nasty surprises. And I have also set the Prerendered files folder to D:\Vegas-prerendered\, a new folder that I have made on a different drive from Vegas Pro (C:\) and my video assets (.m2t files and .avi files which are on my E:\ drive). Actually the prerendered files folder is irrelevant to what we are doing now and you can leave it in the default location on C:\ drive if you don't have a separate drive.
Now set the properties on the Audio tab of Project Properties:
You want to be careful with the sample rate to avoid resampling which will lose some quality. Check the sample rate of the majority of audio in your timeline and match that. If you are mainly using audio that comes off a device such as an HDV or AVCHD camera or ripped from a DVD then you should probably choose 48,000 Hz for the Sample rate (Hz). However if your sound track is dominated by music taken from a CD or the net then choose 44,100 Hz (unless you know it's different) and let any of the 48,000 Hz audio from the camera resample to 44,100 Hz in the mix.
When you are ready to render, choose File > Render As.
File name: I always call it fs.avi and save it in my D:\ drive so I know where it is.
Save as type: Choose DebugMode FrameServer (*.avi) from the drop-down list:
If you only want to render a portion of your timeline then make a loop region on the timeline and tick Render loop region only.
Click Save.
3.2 Debugmode Frameserver
When the Frameserver window pops up choose RGB24. If you want to read about the other settings then read the usage instructions, visit the Frameserver Discussion Group, and read this thread on the Sony Vegas Pro Video forum.Choose Next and you should see this:
There will now be a file called fs.avi on your drive, but it's only a small file known as a "signpost" file. The Frameserver is a very clever piece of software that feeds the data as it's required by the application receiving it. Instead of frameserving the data you could write the video to an intermediate file, but then you will have an extra step, a big file to deal with, and a small loss of quality.
3.3 AviSynth
AviSynth can be a little scary at first because it is text-based and we are using it without a GUI. But it's really not too heavy.Copy and paste all the following 46 or so lines of text into Notepad or your preferred text editor.
# Open frameserved source.
# Change path and file name as appropriate.
AviSource("d:\fs.avi")
# Convert to YV12 so filters will work.
# Use interlaced layout for conversion.
# Change "true" to false" for progressive source.
# Use Rec.709 coefficients. Keep full range [0,255].
# Leave it out if you frameserve in YUY2 format.
ConvertToYV12(interlaced=true, matrix="PC.709")
# Assume footage is top field first.
# If it's bottom field first then use AssumeBFF.
# Leave it out for progressive source.
AssumeTFF
# Resize width by Lanczos3.
# Use 1280 for HD source.
# Use 854 for standard definition widescreen source.
# Use 640 for standard definition 4:3 source.
# Leave it out if horizontal resolution is already correct.
LanczosResize(1280,height)
# Deinterlace with QTGMC script.
# Available presets are placebo, very slow, slower,
# slow, medium, fast, faster, very fast, super fast,
# ultra fast, draft. Default is medium.
# Slower presets unnecessary for HD.
# ultra fast requires Yadif.
# Leave out FPSDivisor=2 for smoother double frame rate.
# Leave out the whole line for progressive source.
QTGMC( Preset="faster", FPSDivisor=2 )
# Resize height by Lanczos3.
# Use 720 for HD source.
# Use 480 for standard definition source.
# Leave it out if vertical resolution is already correct.
LanczosResize(width,720)
# Scale levels from [0,255] to [16,235].
# Compensates for Flash Player scaling [16,235] to [0,255].
# Leave it out if you are conforming levels in your NLE.
# Leave it out if you frameserve in YUY2 format.
# See http://www.bubblevision.com/underwater-video/YouTube-Vimeo-levels-fix.htm
# ColorYUV(levels="PC->TV")
# Compensates for Flash Player scaling [16,235] to [0,255].
# Leave it out if you are conforming levels in your NLE.
# Leave it out if you frameserve in YUY2 format.
# See http://www.bubblevision.com/underwater-video/YouTube-Vimeo-levels-fix.htm
# ColorYUV(levels="PC->TV")
Let's analyse the script piece by piece. Any line beginning with # is ignored when the script runs, so you can use that for comments and to temporarily leave lines out.
AviSource("d:\fs.avi")
Opens your frameserved signpost file. Change the path and filename to whatever you saved it as.
ConvertToYV12
The RGB24 output of Framesever must be converted to YV12 so that the AviSynth filters will work (more info here).
interlaced=true
Tells the Convert operation that the footage is interlaced so that it can convert correctly. If your footage is progressive (not interlaced) then change true to false.
(matrix="PC.709")
Use Rec.709 luma coefficients, which are the standard for HD video, and keep the full range of values [0 to 255] rather than scaling to [16 to 235]. For standard definition video you should use (matrix="PC.601") instead, except if you are encoding for YouTube, who use Rec.709 at all resolutions.
AssumeTFF
Change this to AssumeBFF if necessary. Leave this line out completely if your footage is progressive. My HDV footage is interlaced top field first so I use AssumeTFF. My DV footage is bottom field first so I change this to AssumeBFF. Try either MediaInfo (works for HDV) or Gspot (works for DV) to analyse the field order of your footage.
LanczosResize(1280,height)
Lanczos3 usually offers better quality (fewer artifacts) and a sharper image than the bicubic resizing done by Vegas Pro (more info here). 1080p is more likely to stutter than 720p on many current computers and connections, and at the time of writing Vimeo does not offer 1080p videos. So for HD we are going to resize to 720x1280, which is still HD. For HD use 1280. For widescreen standard definition footage to upload to sharing sites use 854. For 4:3 standard definition footage use 640. It is faster to scale the width before the deinterlacing than after, so this line resizes in the horizontal direction only. If you are self-hosting then try to choose a size from the "Best (16)" columns here or here. Leave this line out completely if the horizontal resolution of your footage is already correct.
QTGMC( Preset="faster", FPSDivisor=2)
Deinterlace using the QTGMC script. Leave this line out completely if your footage is progressive. There are lots of options that you can use with QTGMC but the preset used selects sensible settings for a given encoding speed. The available presets are placebo, very slow, slower, slow, medium, fast, faster, very fast, super fast, ultra fast and draft. The script's default preset is medium, which is good for a standard definition render. For HD, I recommend using faster, very fast or super fast, although you might use medium for a "no compromise" render. Other QTGMC options are very well documented in the QTGMC-3.32.html file in your AviSynth plugins folder. Further reading on the QTGMC thread at Doom9. Leave that line out completely if your footage is already progressive.
FPSDivisor=2 makes QTGMC keep the original frame rate, which is what YouTube and Vimeo require. If you set FPSDivisor=1 (or delete it, since 1 is the default value), you get double the original frame rate because the footage has been bobbed (= fields separated, resized x2 to frame height, and played one after the other). That can be great for offline playback or even self-hosted web videos. Try it some time. I guarantee your interlaced footage has never looked so smooth on a computer screen. You can also use this for great slow motion at 50% of the original speed.
If you want to try QTGMC's ultra fast mode (= lower quality!) then you will need to add the Yadif deinterlacer to your AviSynth plugins folder. I have found that I need to manually load Yadif by adding this line as the first line in my script: loadcplugin("c:\program files\avisynth 2.5\plugins\yadif.dll")
LanczosResize(width,720)
Finally we resize the height of the video using the Lanczos3 algorithm. For HD use 720. For standard definition footage use 480. Or use your chosen resolution for self-hosting. Leave this line out completely if the vertical resolution of your footage is already correct. Note that if your footage is progressive you can actually do the resizing in one line, such as LanczosResize(1280,720).
ColorYUV(levels="PC->TV")
Web browsers' Adobe Flash Player plugin will expand the luminance levels of the video is receives from YouTube, Vimeo, Facebook, JWPlayer etc. from [16,235] to [0,255], thereby increasing the contrast. If you have shadow details in the 0-16 range, these will be clipped to plain black. If you have highlight details in the 235-255 range, these will be clipped to plain white. If you wish to retain these details, this optional line compensates for the luminance expansion in advance by doing exactly the opposite. i.e. A [0,255] to [16,235] conversion. Read more on this page that helps you conform video levels for the web. You should either conform to Studio RGB levels in your NLE or in this AviSynth script, but not both.
One final note... You could leave out the line ColorYUV(levels="PC->TV") and instead use Rec709 in the 2nd line of your script. i.e. ConvertToYV12(interlaced=true, matrix="Rec709". The end result will be very similar. If you are not resizing or deinterlacing in AviSynth then I recommend this to minimize the number of conversions. But if deinterlacing and/or resizing, I prefer to maintain the full range of levels and then "squeeze" them at the end with ColorYUV(levels="PC->TV").
3.4 MeGUI
3.4.1 x264 Video Encoding Setup
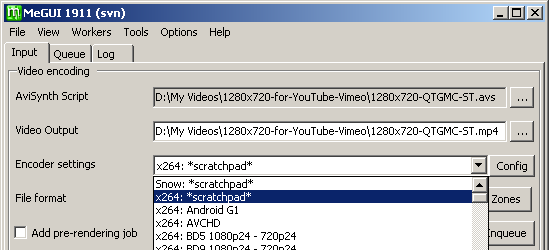
In MeGUI navigate to your AviSynth script in the AviSynth script field. In my case this is D:\My Videos\720x1280-for-YouTube-Vimeo\1280x720-QTGMC-ST.avs. Assuming you didn't stop the Frameserver, you should see a preview window of the video that MeGUI is receiving from your AviSynth script.This preview uses Rec601 luma coefficients, so it expands the levels out to [0,255], just like the Flash Player will later. Don't worry, the file rendered by MeGUI will be correct at [16,235]. The preview is unlikely to play smoothly but you can take a look around to see a preview of the result of the deinterlacing and resizing work, then close this window. You can reopen it at any time with the Reopen Video Preview button in the main MeGUI window.
Choose x264: *scratchpad* from the Encoder settings menu.
Then click Config next to it, to open the x264 configuration dialog.
We need to set the bitrate/quality of the video to be appropriate for the intended use. You can target a constant quality, by choosing Targeting Quality from the Modes list in the Main x264 window, but then the bitrate of the video stream in your video will vary, depending on the amount of movement and detail, and uniformity of colour in the video. For example sports video taken with a handheld camera will have a higher bitrate at the same quality setting than a "talking head" or studio interview shot with the camera on a tripod. Slideshows and cartoons generally require even less bitrate. Assuming you have a good internet connection, constant quality is a good setting for uploading videos to sharing sites, where bitrate is not as critical as quality.
The Quality number is known as a constant rate factor, or "crf" number. For a higher quality/higher bitrate choose a LOWER crf number, or vice versa. Yes, that's confusing. For sharing sites we want to upload a video with plenty of bitrate/quality "overhead" so that they can make a good job of the subsequent encode on their server. I suggest you keep the crf between 18.0 and 21.0 unless you have a tiny upload bandwidth. There is not much to be gained by going below 18.0, and the file you have to upload will be bigger. In my tests using the QTGMC faster preset, a crf of 19.0 gives a bitrate of between 4 and 10 Mbps at 1280x720 and around 3 Mbps at 640x480, depending on the detail and movement in the footage.
If you are preparing a file to host yourself in a Flash player such as JWPlayer or Flowplayer or in the HTML5 <video> tag then you probably want more control of the bit rate. Choose the Targeting file size mode and then choose the minimum bitrate that gives the desired quality so that buffering time and hosting costs are minimized.
The following table gives suggested bitrates/quality-based crf values depending on the type of video, the resolution and the intended use. Adjust these suggestions according to your own needs.
If you have a series of similar videos and you wish to self-host them, you might try determining a quality crf value through trial and error that gives approximately the right bitrate, and then using Targeting quality instead of Targeting file size. But you should still check the file size and/or the bitrate of the rendered videos (try MediaInfo) to make sure they are in the right ball park.
For upload to sharing sites or for playback in a web browser on a PC, the other x264 default settings are fine, although adjusting the Deblocking settings may help in some circumstances (see "Advance Functions" below). If you want to target other playback devices such as phones and tablets then use the appropriate MeGUI presets (and adjust the resize resolution in your AviSynth script according to the device resolution).
In the Presets section, click New and save the preset with a memorable name that you can choose next time from the Encoder settings pulldown menu in main MeGUI window.
Rendered files should open without problem in Vegas Pro 10.0c. The decoder in earlier versions such as 8.0c is much more choosy. If you really need playback of the file in Vegas Pro 8.0c, check the Show Advanced Settings box then set Adaptive B-Frames to 2-Optimal. This worked for me with MeGUI version 1989 and x264 version 1911 (however in MeGUI version 1911 / x264 version 1867 I had to disable B-Pyramid and P-frame Weighted Prediction instead). Smooth playback in Vegas Pro 8.0c is almost impossible, but the image can be studied in the preview window when the video on the timeline is paused.
3.4.2 Nero AAC Audio Encoding Setup
Back in the main MeGUI window, navigate to your AviSynth script in the Audio Input script field. Here you could probably select your frameserved .avi signpost file, but I have always chosen the AviSynth script which effectively outputs the same audio stream.Choose Nero AAC: *scratchpad* from the Encoder settings menu.
Then click Config next to it to open the Nero AAC configuration dialog. Choose an AAC Profile of AAC-LC (the HE profiles gave me double-speed audio on Facebook). Uncheck Normalize Peaks (I prefer to set audio levels in my NLE).
If you are preparing a file for upload to YouTube, Vimeo, Facebook etc. then choose Constant Bitrate and set the slider to 320 kbit/s. You can use the arrow keys on your keyboard for fine tuning. The video host is going to re-encode your audio to something like 128 or 156 kbps AAC. 320 kbit/s is a high setting for compressed audio, but the video stream of your file is so large that there is no point scrimping on the audio bitrate of the file we send them, so let's give them plenty of quality to work with.
Finally create a new preset for your audio settings, as you did for your video settings.
If you are preparing a file to host yourself in JWPlayer or similar then choose Adaptive Bitrate and set it to 156 kbit/s.
3.4.3 Rendering with AutoEncode
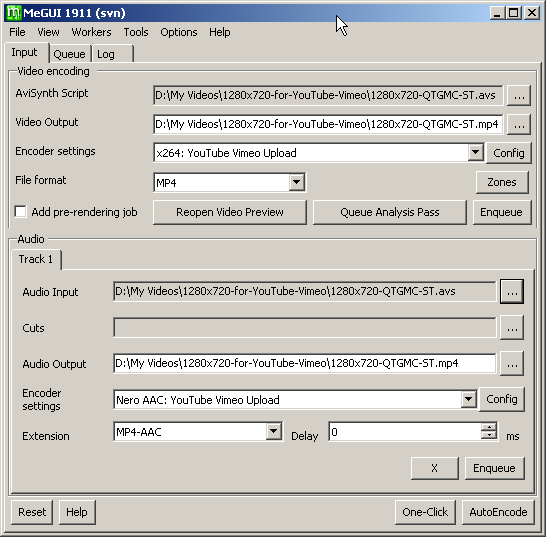
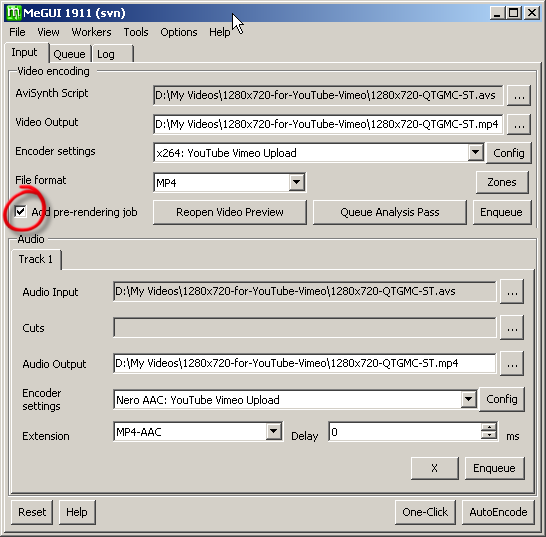
By default the video output and audio output streams take the name of the AviSynth script but with an .mp4 extension. Leave this as it is. Your MeGUI Input window should end up looking something like this:Click the AutoEncode button at the bottom right. The name of the output will default to the same name but with a "-muxed.mp4" suffix. Change this to whatever you want, or accept the default and rename it later.
Click Queue and then switch to the Queue tab in the main window. Assuming you are doing a constant-quality render, you should see 3 jobs in the queue. Firstly the Nero AAC audio encode to a .m4a file. Secondly the x264 encode to a .264 file. And finally the mux of those 2 streams into a .mp4 file. If you are doing a 2-pass render for self-hosting then you will see the first analysis pass appear as an extra job.
Click Start and the Status window will pop up. The audio encoding and muxing will complete very quickly compared to the video encoding. The Processing rate information is useful for testing your rendering settings (e.g. comparing the speed of QTGMC presets).
When the rendering is complete, the .m4a audio file and .264 video file will be automatically deleted and you will be left with your muxed .mp4 file ready for upload.
By default, completed jobs remain shown in MeGUI's Queue window. When testing I like to see how long a job took before clearing them with the Clear button. Widen the window to see the FPS (frames per second) column. However once you're "in production" you can check Delete completed jobs in the settings window. You can also check AutoStart Queue to save on clicks, however you would probably not want to do that if you were using MeGUI to batch encode.
When your encode is finished, choose Stop Serving on the Frameserver window and Close the Vegas Pro rendering progress window.
You can get lots of information about the file you just rendered by using Mediainfo (switch to Tree or Text under the View menu). You can also check it by playing it in software such as VLC Media Player. The completed mp4 files play smoothly in Vegas Pro 10.0. In Vegas Pro 8.0 they will open but the video plays very poorly. I have not tried them in Vegas Pro 9.0.
3.4.4 Silent Movies for YouTube
YouTube has a broken mp4 demuxer. If you mux FAAC AAC or LAME mp3 audio into an mp4 container it will mess up your video. Similarly if you send them a MeGUI-made mp4 file that does not contain an audio stream at all, it will also mess up your video, typically with garbled frames in the first few seconds.The first way to deal with this is to include a silent Nero AAC audio stream with the video. Mute any unwanted audio in Vegas Pro and then proceed as described above, except I recommend you reduce the Constant Bitrate all the way down to 16 kbit/s in the Nero AAC configuration dialog.
Your second option is to mux with a mkv container instead of mp4 by choosing MKV as the Container in the Automatic Encoding options:
Some people prefer to use mkv rather than mp4 for everything, including videos with audio, and sites like Vimeo and Facebook can also accept them, but the disadvantage is that the file cannot be opened in Vegas Pro for checking. However VLC can play mkv files.
4. Advanced Functions
4.1 Reducing Banding with SmoothLevels
If you see banding in your videos you could try converting levels with a SmoothLevels filter instead of ColorYUV. SmoothLevels uses a smoothing and dithering algorithm to reduce banding. Download the latest version of SmoothAdjust from the first post in this thread on doom9,and unzip the appropriate .dll file to your AviSynth plugins folder (x86 for 32-bit, x64 for 63-bit). Either the ICC or MSVC version should work, but probably at different speeds because they were built with different compilers. If you have an Intel CPU then choose the ICC version. Then replace ColorYUV(levels="PC->TV") with SmoothLevels(preset="pc2tv") at the end of your AviSynth script. SmoothLevels is slower than ColorYUV.4.2 Reducing Noise or Retaining Grain in Interlaced Footage with QTGMC
QTGMC can remove, preserve or strengthen visual noise and very fine detail. There is information about denoising and examples in the QTGMC-3.32.html help file which you unzipped to your AviSynth folder. At the simplest level you can try a line like QTGMC( Preset="faster", EZDenoise=2.5 ) to reduce noise in your footage. Higher values for EZDenoise reduce noise more. The best way to determine the desired value is to use ShowNoise (read the help page!). Conversely, to preserve wanted grain from your original footage you could try QTGMC( Preset="faster", EZKeepGrain=1.0 ). Higher values for EZKeepGrain retain more grain. If you are uploading video to YouTube/Vimeo etc., bear in mind that more grain and detail in your video will make the job of their encoder more difficult, especially if there is lots of movement. YouTube in particular is likely to lose any grain you attempt to preserve using QTGMC.4.3 Introducing Motion Blur when Deinterlacing with QTGMC
QTGMC makes an excellent job of deinterlacing and gives a sharper result than other methods such as simple field blending. However in our process we throw away one of the fields we record, which is half the temporal resolution of our footage. The result of this can be a "staccato" effect, where motion does not appear smooth. To counteract this, QTGMC can introduce motion blur to make the playback appear smoother and more like your original interlaced footage would appear on your camera or TV. Adding motion blur is especially useful for high-contrast footage containing sudden or non-linear motion, or for footage that was shot with a fast shutter speed. It is probably not worth bothering with for low-motion footage where you don't want to compromise sharpness.QTGMC needs to know the shutter angle of your source, and the shutter angle that you would like to simulate in the progressive (non-interlaced) output. Shutter angles derive from traditional film cameras which use rotary shutters. The calculations to convert shutter speed to shutter angle for progressive footage can be found here.
Cameras that shoot interlaced footage normally default to a shutter speed of 1/50 at 50i, or 1/60 at 60i, unless they need to speed up the shutter speed because the iris is already as small as it will go. Because of the difference between fields and frames, the whole concept of shutter angle for interlaced footage is rather irrelevant and confusing. However for the purposes of QTGMC we should use the following formula:
ShutterAngleSrc = 360*FramesPerSecond/ShutterSpeed.
Remember we have half as many frames as we have fields. So for example if you have 50i footage with a shutter speed of 1/215, then:
ShutterAngleSrc = 360*25/215 = 42°
1/50 at 50i:ShutterAngleSrc = 360*25/50 = 180°
1/60 at 60i:
ShutterAngleSrc = 360*30/60 = 180°
In many cases you can use DVMP Pro to view the shutter speed of your captured footage.
Cameras that shoot progressive footage normally default to a shutter speed of 1/50 at 25p, or 1/60 at 30p, which is equivalent to a shutter angle of 180 degrees, but some shooters prefer to use 1/25 at 25p or 1/30 at 30p which is equivalent to a shutter angle of 360 degrees, and means the camera is recording everything it sees over time, not just half.
So, for example, to deinterlace and simulate the motion blur of 1/50 at 25p (i.e. 180 degree shutter angle) from interlaced footage that was shot at 1/215 at 50i, use a line like the following. You could term this "50% motion blur", and is a good setting to try first:
QTGMC( Preset="faster", FPSDivisor=2, ShutterBlur=3,
ShutterAngleSrc=42, ShutterAngleOut=180 )
To deinterlace and simulate the motion blur of 1/25 at 25p, or 1/30
at 30p (i.e. 360 degree shutter angle) from interlaced footage that was
shot 1/50 at 50i, or 1/60 at 60i, use a line like the following. You
could term this "100% motion blur", and may soften the image too much
for your liking:QTGMC( Preset="faster", FPSDivisor=2, ShutterBlur=3, ShutterAngleSrc=180, ShutterAngleOut=360 )
For more information and further settings, consult the QTGMC-3.32.html help file which you unzipped to your AviSynth folder. Also read this post on doom9 by the QTGMC author.
4.4 x264 Deblocking
Blocking is the appearance of visible rectangular artefacts, or "blocks" in the video as a result of the compression process. YouTube videos usually display lots of them in dissolves and fades. x264 deblocks by default, and you should usually not disable this entirely. However you can alter how much deblocking is applied by adjusting Deblocking Strength and Deblocking Threshold on the Frame-Type tab.If you do this, keep them both within the range -3 to 2 and keep them both the same or within 1 value of each other. Negative numbers reduce the amount of deblocking and preserve more detail. This will be sharper but will increase the chance of blockiness. Positive values decrease the chance of blockiness but soften/blur the video. You can get away with less deblocking at high bitrates, so for upload to YouTube, Vimeo etc., you could try setting Deblocking Strength to -2 and Deblocking Threshold to -1. For lower bitrates for self-hosting I usually leave them both at 0. More info about x264 deblocking on the doom9 forum. Also, this guide encourages adjusting deblocking settings, whereas this guide generally discourages it. As visual comparisons are very hard to make, I suggest trying it with some extreme settings at first so you know what you are looking for in the rendered video.
4.5 Slow Motion
If your source footage is interlaced, QTGMC can give you fantastic slow motion at 50% of the original speed in a progressive output. To do this, change the value of FPSDivisor in the QTGMC line of your AviSynth script, and add the AssumeScaledFPS straight after it:
...
QTGMC( Preset="faster", FPSDivisor=1 )
AssumeScaledFPS(divisor=2)
...
Other slow motion rates can be achieved by using MVTools, that you
installed as a QTGMC requirement, but until I get around to trying it
and writing a guide, you'll have to make do with the guidance here,
here
and here.
Good luck!QTGMC( Preset="faster", FPSDivisor=1 )
AssumeScaledFPS(divisor=2)
...
4.6 Getting Deinterlaced/Resized Footage Back Into Vegas Pro
You might want to deinterlace and/or resize footage in AviSynth and then get it back into Vegas Pro, or another NLE, for further processing instead of immediately encoding for the web in MeGUI. You can either render a lossless intermediate file, or attempt to frameserve the footage back into Vegas Pro with the VFAPI Converter. In each case keep an eye on changes in luminance, which can easily happen as the video is transferred between applications and formats. Such changes can be corrected in Vegas Pro (Sony Levels FX etc.) or your AviSynth script (e.g. by changing the options in your ConvertToYV12 line).4.6.1 Rendering an Intermediate File with Lagarith and VirtualDub
You can render a lossless intermediate file and put this back into Vegas Pro. Install the Lagarith lossless video codec and VirtualDub. Open your AviSynth script (.avs) in VirtualDub then choose Video > Compression > Lagarith Lossless Codec > Configure > Mode > RGB > OK. Then choose File > Save As AVI... and render your file. You could also try YV12 mode.4.6.2 VFAPI Converter
If you are brave you can use the VFAPI Converter as yet another frameserver to convert your .avs file into a dummy .avi file that Vegas Pro can read, thereby saving time and storage space. Install this version of the VFAPI Reader Codec by unzipping the file, moving the VFAPICodecV105en folder to a location such as C:\Program Files\, then running the vifpset.bat file. Then run the VFAPIConv.exe file > choose Add Job > choose your .avs file > check all 3 options > choose an Output-File > OK > Convert. After it has processed you have a dummy .avi file that you can put onto the timeline in a 2nd instance of Vegas Pro. Be warned, this is demanding on your system as you now have 2 instances of Vegas and 3 different frameservers running in series. Performance will be slow and potentially unstable. It is often easier to just save a lossless intermediate file instead.5. Speeding Things Up
5.1 Multi-Threading
QTGMC is slow, but once you have it working you can speed it up by using it multi-threaded, in a 32-bit or 64-bit environment. This works best for CPUs with 4 or more cores. According to the author of QTGMC, "with less cores there is less scope for MT tweaking, especially at HD, but if you ever see your CPU is not close to 100%, then you should see if you can get more out of MT (unless you have stability issues)".There are instructions on how to do this in the QTGMC-3.32.html file in your AviSynth plugins folder, and more discussion in the QTGMC thread at Doom9. A key explanation is in post #389, and there is further key discussion starting here. Optimizing multi-threading is a process of trial and error. According to the author -Vit-, "there are occasional instabilities with multi-threading, because AviSynth is not quite thread-safe. These instabilities affect different users in different ways: some report no issues, others can barely get multi-threading to work at all".
To try it, download and install an "MT" version of AviSynth. First try the most recent SEt's build of AviSynth 2.6. Some have found that it won't open RGB24 format, and that RGB32 is much slower. If so then frameserve in YUY2 format and remove the ConvertToYV12... and ColorYUV... lines from your script. If using AviSynth 2.6, some have surprisingly found that mt_masktools-25.dll still works better than the mt_masktools-26.dll that is also included in the zip download. If your source is YUY2 then you must use mt_masktools-25.dll, regardless of your AviSynth version.
If that multi-threaded AviSynth version gives you stability problems then you could try alternative older multi-threaded builds of AviSynth 2.5.8 here, here, here, or here. Also, here is another discussion thread about achieving multi-threaded stability.
Update: -Vit- has now posted a package of plugins that contain a minor modification that may improve multi-threading stability. Find a link for it in the first post on his QTGMC thread at Doom9.
Start with a script like the following one and call it something like 1280x720-QTGMC-MT.avs to distinguish it from the single-threaded version. The added parts are in orange and you need to change the 3 letters in green according to the instructions in the comments:
# Set maximum memory.
# Setting M:
# First try without the SetMemoryMax line.
# However, using the SetMemoryMax line and a good value for
# M might allow more threads and so give more speed.
# Particularly important for slower settings.
# Try values 400,600,800,1000 etc.
# SetMemoryMax(M)
# Set multi-threaded mode.
# Could try 5 instead of 3 for non-standard source-filter/avisynth combinations.
# Setting X:
# Start at the number of cores in your machine.
# If it crashes, decrease 1 at a time.
# Otherwise, increase 1 at a time until CPU usage is close to 100%.
# Don't go too far or it will slow down and/or become unstable.
SetMTMode(3, X)
# Open frameserved source.
# Change path and file name as appropriate.
AviSource("d:\fs.avi")
# Convert to YV12 so filters will work.
# Use interlaced layout for conversion.
# Change "true" to false" for progressive source.
# Use Rec.709 coefficients. Keep full range [0,255].
# Leave it out if you frameserve in YUY2 format.
ConvertToYV12(interlaced=true, matrix="PC.709")
# Assume footage is top field first.
# If it's bottom field first then use AssumeBFF.
# Leave it out for progressive source.
AssumeTFF
# Set multi-threaded mode.
SetMTMode(2)
# Resize width by Lanczos3.
# Use 1280 for HD source.
# Use 854 for standard definition widescreen source.
# Use 640 for standard definition 4:3 source.
# Leave it out if horizontal resolution is already correct.
LanczosResize(1280,height)
# Deinterlace with QTGMC script.
# Available presets are placebo, very slow, slower,
# slow, medium, fast, faster, very fast, super fast,
# ultra fast, draft. Default is medium.
# Slower presets unnecessary for HD.
# ultra fast requires Yadif.
# Leave out FPSDivisor=2 for smoother double frame rate.
# Leave out the whole line for progressive source.
# Setting Y:
# Start at about half number of cores and tweak upwards
# or downwards for best speed. Y=1 often works well.
# Balance this setting with X (i.e. if you increase X,
# you might need to decrease Y and vice versa).
QTGMC( Preset="faster", FPSDivisor=2, EdiThreads=Y )
# Resize height by Lanczos3.
# Use 720 for HD source.
# Use 480 for standard definition source.
# Leave it out if vertical resolution is already correct.
LanczosResize(width,720)
# Scale levels from [0,255] to [16,235].
# Compensates for Flash Player scaling [16,235] to [0,255].
# Leave it out if you are conforming levels in your NLE.
# Leave it out if you frameserve in YUY2 format.
# See http://www.bubblevision.com/underwater-video/YouTube-Vimeo-levels-fix.htm
# ColorYUV(levels="PC->TV")
# This line may or may not be necessary.
# Try removing it and see if you get more speed.
Distributor()
SetMemoryMax(768)
...
SetMTMode(5, 4)
...
EdiThreads=2
...
Distributor() is off (commented out)
...
SetMTMode(5, 4)
...
EdiThreads=2
...
Distributor() is off (commented out)
5.2 Faster QTGMC Presets
In single-threaded mode, the QTGMC part of this whole workflow takes over 80% of the total conversion time when set to the faster preset. Try very fast, super fast. They may be absolutely fine for HD material. The quality of the ultra fast preset (requires Yadif) is significantly lower, but may be OK for videos with little motion.5.3 One Thing at a Time
You can force MeGUI to write the output of your AviSynth script to a lossless avi file (with the Huffyuv codec) before compressing with x264, rather than reading the frameserved output of the script as it goes along. This can allow QTGMC and x264 to use more threads and memory because they are not competing for your system's resources. I found this slightly slower with everything in single-threaded 32-bit mode, but if you're multi-threading then it might be faster. You will need plenty of disk space. I found that 1 minute of 1280x720 requires approximately 1.1 GB. To do this, check the Add pre-rendering job box on the Input window.You will see 2 extra jobs in your queue. Firstly the Huffyuv file and secondly an index of that file for use by the subsequent x264 encoding job. The Huffuyv avi file will be written to the same folder as your avs script and will be deleted after completion of the jobs. A short AviSynth script called, for example, hfyu_1280x720-QTGMC-ST.avs will be left behind, and you can delete it.
5.4 Overclocking
Try overclocking your CPU, but don't overdo it. There are lots of references on the net for how to do this.5.5 64-bit Operation
I recommend getting AviSynth and its plugins working first in 32-bit mode, but if you have a 64-bit OS, try 64-bit versions of some or all of the programs. The following are available in 64-bit:- Sony Vegas Pro - 64-bit version available in your Sony account. Version 8.1 was lacking some features. Versions 9.0 and 10.0 are better.
- Debugmode Frameserver - An unofficial 64-bit version ported for Sony Vegas Pro and Adobe Premiere Pro by Victor T. is available in exchange for a donation, but users of 64-bit Vegas Pro have reported that the 32-bit version is working for them. Also see the Frameserver discussion group or the Sony Vegas Pro forum.
- AviSynth - 64-bit multi-threaded version available here or in the first post here. Helpful FAQ here.
- MVTools2 - Link to 64-bit version here or in the first post here.
- RemoveGrain - Link to 64-bit version here or in the first post here.
- MaskTools v2 - 64-bit versions are in the same zip file that the 32-bit versions come in.
- nnedi3 - Link to a 64-bit version in the first post here.
- x264 - MeGUI automatically downloads a 64-bit version as well as the 32-bit version.
There is a 64-bit version of MeGUI but it is not recommended yet because not all the tools it uses are available in 64-bit. For the time being just use the 32-bit version.
64-bit AviSynth and its plugins have not been as actively developed as the 32-bit versions. You may encounter some stability issues, but expect this situation to improve rapidly as 64-bit development increases.
6. Credits
Aspects of this workflow were refined while participating in this discussion on the excellent Sony Vegas Pro forum. Many thanks to Musicvid (Mark), amendegw (Jerry), John Meyer, farss (Bob) and Laurence for their help and insight. Thanks to the other folk on the Sony Vegas Pro and doom9.org forums who have contributed hugely to my understanding of video. Thanks to Jerry, Kimberly and "Stringer" (Gregory) for permission to use test footage, and to dxdy (Fred) for hosting test renders on his Vimeo account. And thanks of course to the geniuses who write these amazing free tools that make this possible.This tutorial is discussed on the Sony Vegas forum, dvinfo.net, doom9.org and Vimeo [links coming soon]. If you have questions about this workflow, or if you find errors or improvements, please give me some feedback on one of those discussion threads, or send me an email, especially if you get all or part of the process working with 64-bit or multi-threaded versions of the tools.
Подписаться на:
Сообщения (Atom)

