sony vegas видеоуроки,Sony Vegas Уроки,Сони Вегас Уроки,сони вегас про,Sony Vegas Pro 8.0,@Стабилизация Видео,Sonyvegas,Альфа Канал,@Vegas Pro,SONY Vegas видео уроки Sony Vegas: 07/06/13

УРОКИ СОНИ ВЕГАС

1 урок интерфейс,новый проект; 2 урок захват видео; 3урок импорт файлов в проект; 4 урок обрезка видео; 5 урок размещение файлов проекта в окне монтажа; 6сони вегас навигация в окне монтажа; 7урок вставка новых файлов в середину фрагментов в окне монтажа; 8урок приёмы обрезк; 9урок ефекты перехода; 10 сони вегас урок создание заглавных титров; 11 сони вегас урок создание прокручивыемых титроф для завершение проекта; 12 сони вегас урок новые звуковые дорожки и их создание; 13 сони вегас урок управление громкостью; 14 сони вегас урок Микширование двух звуковых дорожек и их установки; 15 сони вегас урок завершение звукового монтажа и удаление исходных звуковых фрагментов; 16 урок применение видео ефектов; 17 урок ефекты звуковой дорожки;

Поиск по этому блогу

суббота, 6 июля 2013 г.

сравнение Vegas Pro 12 и Movie Studio Platinum 12

HitFilm integration with Vegas Pro 12 and Movie Studio Platinum 12

While Vegas™ Pro 12 and Movie Studio Platinum 12 contain plenty of powerful compositing tools that cover many of your compositing needs, sometimes you need more. That's why we've worked very closely with the good people at FXhome to create tight integration between Vegas Pro and Movie Studio Platinum and their HitFilm products.

HitFilm provides powerful 2D and 3D visual effects at a very affordable price point. This tool brings Hollywood-quality effects and compositing to your studio for a fraction of what you might have thought you'd have to pay for a tool like this. And now, Sony has teamed up with FXhome to provide you with all the tools you'll need to get the job done.

Two new product suites from Sony, the Vegas Pro Suite and Movie Studio Platinum: Visual Effects Suite 2 give you great options for taking your productions to the next level. Both of these suites include versions of HitFilm, so in this article we'll take a look at the integration between Sony and FXhome software. I'm going to write this article as if you already know how to use HitFilm, since we're really focusing on the interoperability between these two applications instead of detailed training for either of them.

Movie Studio Platinum: Visual Effects Suite 2 includes HitFilm 2 Express, while the Vegas Pro Suite includes the super-powerful HitFilm 2 Ultimate. In this article I'll use Vegas Pro 12 to demonstrate the integration between Sony and FXhome, but I'll use HitFilm 2 Express so that Movie Studio Platinum 12 users can follow along. Just remember that HitFilm 2 Ultimate can do everything we'll discuss here and much, much more. Also remember that when I use the names “Vegas Pro” and “HitFilm” throughout this article, I'm also referring to Movie Studio Platinum and both HitFilm 2 Express and Ultimate.

The procedure for moving your files back and forth between Vegas Pro and HitFilm really couldn't be much easier. If you've ever moved an audio file back and forth between Vegas Pro and Sound Forge™ Pro, then you'll be very comfortable with how this integration works.

Before you get started, it's critical to pay attention to the order in which you installed your software. When you install HitFilm, the installer checks for Vegas Pro on your system. If Vegas Pro already exists, the HitFilm installer installs a specific plug-in that establishes communication between the two applications. Thus, it's crucial to the operation for you to install Vegas Pro first and then install HitFilm. If you've already done it the other way around, uninstall HitFilm and with Vegas Pro already installed, reinstall HitFilm. When you're done installing the applications in that order, you're ready to go.

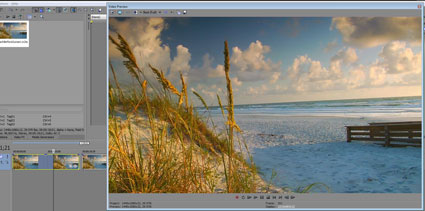
To start, add a file to your Vegas Pro timeline. In Figure 1 you can see that I've added a beach scene to my timeline. The video was shot on mostly sunny afternoon just before sunset. We're going to bring this clip into HitFilm and change the weather to a stormy, rainy day. I've added the same file to two separate events so that we can easily switch back and forth between them to compare before and after once we're done. I've also undocked the Video Preview window and made it much larger so you can see it more effectively.

Figure 1: Click for a larger view
Figure 1: We're going to use HitFilm to turn this fairly sunny scene into a stormy day.

To create this effect, we'll bring this clip into HitFilm and add dark clouds and rain along with a brightness and contrast filter to make it look darker. To open this clip in HitFilm, right-click the event that holds it on the timeline and choose Add HitFilm Effect from the menu.

This launches HitFilm and opens a new project with your file already on the timeline. Now that you have it in HitFilm, you can work all kinds of magic on the file. First, select the event on the HitFilm timeline and click the Make Composite Shot button. In the Make Composite Shot dialog box, click Convert. Now you can add other elements to this composite shot.

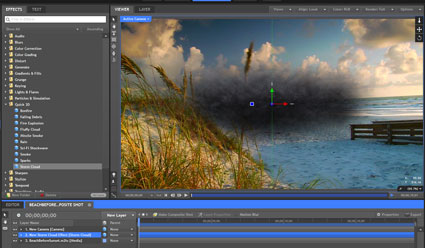
From the Effects tab, click the Quick 3D Expand arrow. Drag the Storm Cloud preset into the timeline. Click Yes when HitFilm asks if you want to add a camera. Figure 2 shows my project so far and you can see that HitFilm has generated a big black storm cloud in the middle of my preview window.

Figure 2: Click for a larger view
Figure 2: We've added a storm cloud generator to the composite shot in HitFilm.

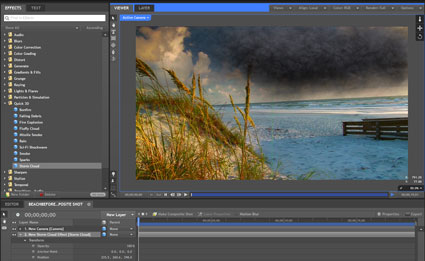
Use the Transform tools to reposition and resize the storm cloud so that it sits in the sky where you'd expect it to be. Try manipulating the cloud in all three dimensions to get it to look exactly as you want it. Figure 3 shows my project after I've repositioned the dark cloud.

Figure 3: Click for a larger view
Figure 3: I've resized and repositioned the dark cloud into a more realistic position in my video.
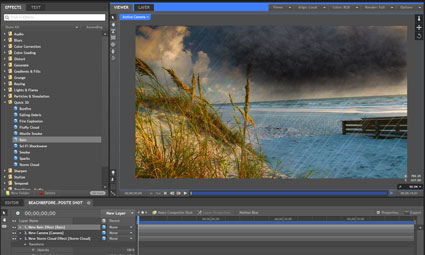
With the storm cloud in place, let's add some rain. Drag the Rain preset into the timeline. The wind is coming from the right in the video, so rotate the rain generator to make it look as though the rain is being driven by the wind. Make any other adjustments to the rain that you think it needs in order to make it look more realistic. Figure 4 shows my project after I've added and adjusted the rain.

Figure 4: Click for a larger view
Figure 4: With the rain generator added, the storm's really starting to kick up!

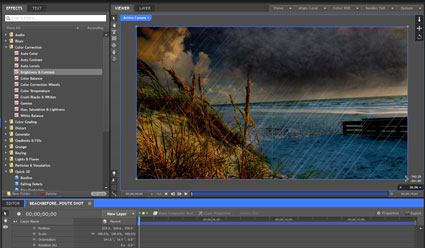
With all of this storming going on, the base layer still looks too bright and sunny, so let's fix that quickly. Click the Color Correction Expand arrow in the Effects tab and drag the Brightness & Contrast filter onto the base layer in the timeline. Adjust the Brightness control to make the scene look darker. Maybe add a touch of contrast to make the scene even more dramatic. Figure 5 shows my results.

Figure 5: Click for a larger view
Figure 5: After darkening the base layer, the storm effect is complete.

You might also want to animate the storm clouds a bit to give the impression that they're swirling and roiling in the fury of the storm. Once you're done with all of your adjustments, click the Save button.

Switch back to Vegas Pro. The event that holds the original clip updates automatically and now you have your stormy-day video on your Vegas Pro timeline. You can work with it just like you would any other clip in your project. You can see my Vegas Pro project in Figure 6.
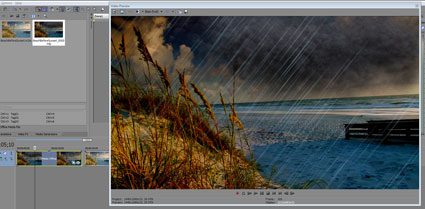
Figure 6: Click for a larger view
Figure 6: After saving your work in HitFilm and returning to Vegas Pro, your project updates automatically with the affected video already integrated into it.

In Figure 6 you can see the difference between the first event on your timeline, which holds the altered clip, and the second event which holds the original clip. Compare Figures 1 and 6 to see how my video looks before and after the adjustments in HitFilm. Also notice the Project Media window. You can see that in addition to the original clip, a new clip appears in the media list. This new clip is actually the HitFilm project you just created.

In other words, when you open an event into HitFilm, Vegas Pro replaces the media that filled the original event with a new piece of media: the HitFilm project file that was automatically created. All of this happens behind the scenes, so you don't need to worry about it. But it does point out that Vegas Pro supports HitFilm project files on the timeline. This means you can add your HitFilm work to Vegas Pro whether you evoked HitFilm from Vegas Pro or not. Once you drop a HitFilm project onto your Vegas Pro timeline, you can edit it just as you would edit any other event. In addition, you can go back to HitFilm and edit your project further there. To do so, right-click the event and choose Edit in HitFilm. When you save your HitFilm project, the file updates automatically upon your return to Vegas Pro.

The interoperability between Vegas Pro and HitFilm makes this team of applications an extremely powerful way to work. For more information on HitFilm, visit the FXhome website. For more Vegas Pro training resources including free videos, webinar archives, training article archives, and more, visit the training page at www.sonycreativesoftware.com/training.
 

Сони Vegas Про 12 что нового

Introducing an All-New Sony Vegas Pro

Sony Vegas Pro 12
Late this summer, Sony released their latest upgrade to their Vegas editing application – Vegas Pro 12.  This version of Vegas adds tons of feature enhancements and performance improvements.  Since this is one of the main tools we use in our arsenal, we wanted to see just how well this new software worked so we took it on a test drive and compared it directly with its predecessor.
For those who aren’t familiar with Vegas Pro, Sony has put together a collection of integrated, cutting-edge video production environment tools for professional video editing, audio mixing, and DVD/Blu-ray Disc authoring.  Vegas Pro, like its other competitors on the market – Apple’s Final Cut Pro, Adobe Premier, and Magix Video Pro – supports a large number of image, video and audio formats, and also includes a large OpenFX plug-in architecture.  Other workflow innovations built into Vegas Pro 12 make it easy for a user (or Director) to deliver a story and express their vision.

Vegas Pro allows you to edit standard-definition, High-definition, 2k and 4k material even in 3D with relative ease.  Traditionally, the Sony Vegas interface has always had innovative tools and a very user friendly track-based editing layout. Sony promises that the dozens of additional feature enhancements and performance improvements will make the upgraded Vegas Pro 12 that much stronger.
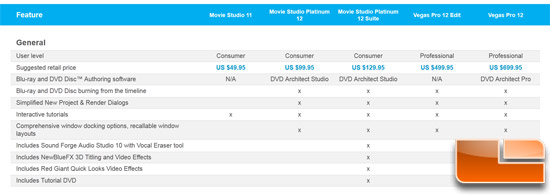
The Sony Vegas family of software includes the Vegas Pro line, as well as the Sony Movie Studio for movie makers who aren’t trying to win an Oscar.  Between the pro-line and ‘novice ‘packages, there should be a product that meets your needs.  Here is a quick look comparing the Vegas family of software (Click for larger image):
Sony Vegas Family Comparison
When you pick up the Vegas Pro 12 Suite it includes version 12 of Vegas Pro (of course), as well as DVD Architect Pro 5.2 DVD-authoring software, a Dolby Digital Professional Encoder, NewBlue Pro Titler, more than 30 DirectX audio plug-ins, and over 300 video transitions and effects to bring out your inner George Lucas.  The list price for Vegas Pro 12 is $699, but you can find it for as low as $460 at your favorite retailer.  Upgrades from previous versions of Vegas Pro to Vegas Pro 12 will be available for $199 as well.

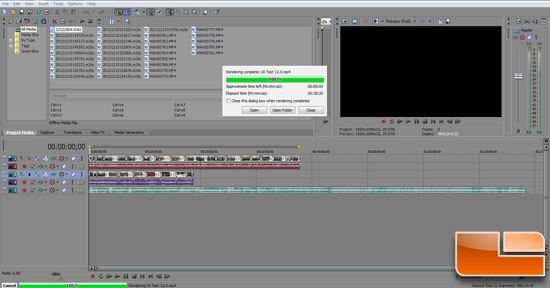
Sony Vegas Pro 12 Workspace
Product Features:
Precise Video Editing Tools
  • Interactive, dynamic timeline trimming using the Expanded Edit Mode
  • Smart Proxy clips achieve full frame rate playback of image sequences and other challenging media formats
  • Visual confirmation of event alignment when moving clips on the timeline
  • Intuitive Event Handles and Controls on every timeline event creates a more fluid, effortless editing environment
Broadcast Workflow
  • Work with high dynamic range S-log files from Sony cameras including the PMW-F3, F-23, F-35, and F-65
  • Import, edit, monitor, and deliver closed captioned programs
  • Capture and compress video directly to XDCAM™-compatible MXF files from supported SD/HD-SDI devices
  • Deliver higher resolution with 4k support for projects up to 4096 by 4096 pixels
  • Ingest, edit, preview, and deliver stereoscopic 3D video
Extensive Capture and Export Support
  • Edit XDCAM, AVCHD, NXCAM, RED ONE® and EPIC®, HDCAM-SR™ and Panasonic P2 media natively, with no transcoding or re-wrapping
  • Supports Digital SLR workflows using h.264 Quicktime files or AVCHD recording
  • Encode to HDCAM-SR for pristine archiving and mastering
  • MainConcept AVC encoder now supports variable bit rates up to 40 Mbps and average bit rate of 25 Mbps
  • MP4 encoding with progressive download function, enablingvideos to begin playing while downloading
Supported Formats:
  • Opens: AA3, AAF, AIF, ASF, AU, AVI, BMP, BWF, CDA, DIG, DLX, DPX, DV, EXR, FLAC, GIF, HDP, IVC, JPG, M2T, M2TS, MOV, Sony MXF (XDCAM and HDCAM SR), MP3, MP4, M4A, MPEG-1 and MPEG-2 video, OGG, OMA, Panasonic MXF (DVCPRO 25, 50, 100, AVC-Intra 50, 100), PCA, PNG, PSD, QT, R3D, SFA, SND, TIFF, TGA, VOX, W64, WAV, WDP, WMA, WMV
  • Saves: AA3, AC3, AIF, ATRAC, AVC, AVI, DPX, EXR, FLAC, HDP, MOV, MP3, MPEG-1 and MPEG-2 video, MP4, M2T, Sony MXF (XDCAM and HDCAM SR), OGG, PCA, W64, WAV, WMA, WMV
  • DVD encoding, Video: NTSC 4:3, NTSC Widescreen, PAL 4:3, PAL Widescreen
  • DVD encoding, Audio: AC-3 5.1 or stereo, PCM
  • BD encoding, Video: MPEG-2 or AVC, 1080-60i, 1080-50i and 1080-24p
  • BD encoding, Audio: AC-3 5.1 or stereo, PCM

Now, don’t make the mistake in thinking that you found a great deal for Sony Vegas 12 if you find something much less than these prices.  Sony actually released two flavors of Sony Vegas 12 – Pro and Edit.
Sony Vegas Family
Sony Vegas Pro 12 Edit is lower cost package identical in editing features and performance.  The Edit version comes with everything that the Pro version has except for DVD Architect Pro 5.2 and Dolby Digital Professional Encoder and lists for $499 (~$360 street).
Unlike Adobe’s Creative Cloud service, Sony only charges a one-time charge for using Vegas Pro 12.  While the Creative Cloud service is nice, we are still fans of owning the product and install keys.
Let’s take a closer look at the Vegas Pro 12’s new features:
  • 64-bit Exclusively
  • Expanded Edit mode
  • Smart Proxy
  • Color Match
  • Project Interchange
  • Import  Panasonic P2 clips
  • S-log Workflow
  • HDCAM SR Mastering
  • Shape Masking Tools
  • FX Masking
  • GPU acceleration for Titles & Text
  • AVCHD 2.0 support
  • OpenGL® texture extension for OpenFX
  • Plays  Audio Indicator upon render completion
  • Layer Dimensionality plug-in
  • Simultaneous audio/video fades
  • Auto pairing of PMW-TD300 3D clips
  • Auto pairing of PMW-F3 3D Link clips
  • Manipulate colors in L*a*b* color space with LAB Adjust
  • L*a*b* Color Space Histogram
  • Project Media updates
  • File tagging in Project Media view
  • Import .txt into Credit Roll generator
  • Match project to first media added
  • Vertical docking windows
  • Audio monitoring via SDI
  • Vegas Pro Explorer updates
  • Improved L-cut, J-cut editing
  • OpenFX enhancements
  • Orientation metadata for still images
  • User Interface enhancements
  • Share Project Media Lists between multiple projects
  • 64-bit Audio Plug-ins
  • Blu-ray rendering support for MainConcept AVC plug-in
  • Edit Properties for multiple video files
  • Auto Re-Name Titles & Text Clips based on content
  • Timeline Editing and Trimming enhancements
As you can see, the list of improvements over previous versions is pretty great.  In the past Sony Vegas has been criticized as being behind the curve in technology and offerings in its working area.  Some of the biggest improvements include the Project Interchange with other popular editing programs such as Adobe Premier Pro CS6, Avid Pro Tools 10, and Apple Final Cut Pro. There is also Color Match that quickly matches the color characteristics of different video clips, perfect for the multi-camera shoot.
Of course, the biggest improvement we can expect is in project render speed.  On the next page we will perform some tests using Vegas 12 Pro and whether there is any significant performance difference over previous generations of Vegas.

Mixing Audio in Sony Vegas Pro

In this fourth installment of our six-part series of tutorials on Sony Vegas Pro 11, we're going to talk about the new Mixer layout. If you're into audio mixing, you're going to find this really cool because it's going to make your editing experience for audio more like using a traditional hardware mixer. Let's check it out.

Get On the Bus

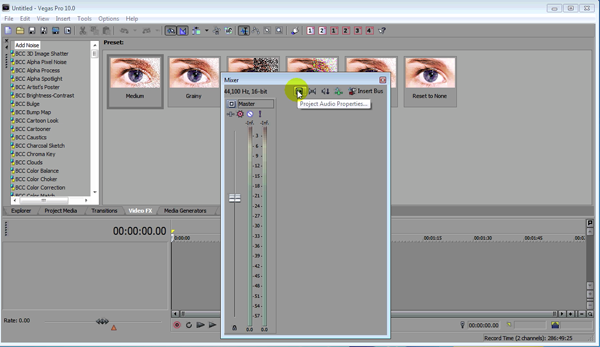
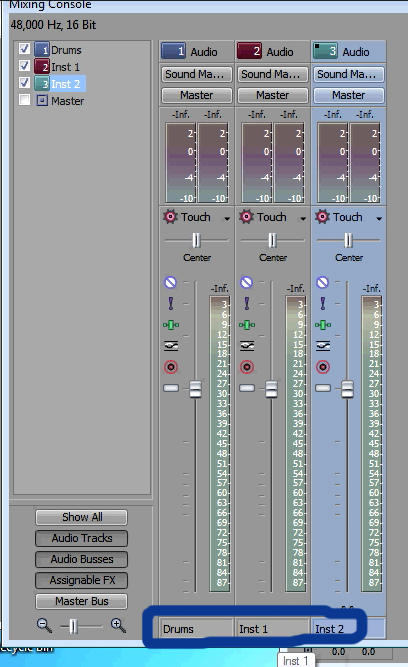
Let's take just a moment and look at the standard two-track Mixer in Sony Vegas Pro 10, the previous version of Vegas (Figure 1, below). You can see we have 44.1 kHz and 16-bit as default sampling rate and bit depth, respectively. We have a few options we can customize, such as Audio Properties, down-mix output, and the ability to insert a bus.
Sony Vegas Pro
Figure 1. The audio Mixer in Sony Vegas Pro 10
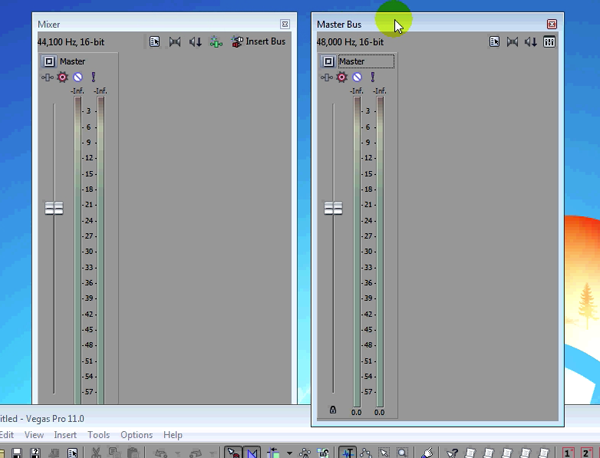
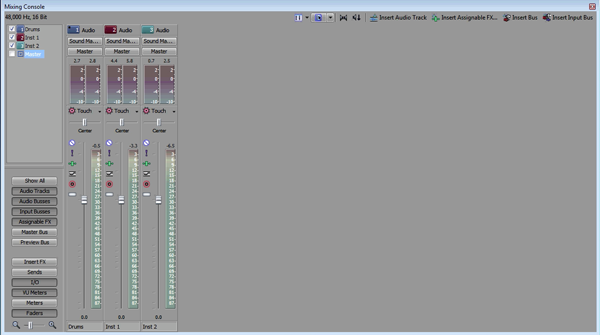
Now, let's look at the somewhat comparable Master Bus in Sony Vegas Pro 11, our current version, and look at them side by side (Figure 2, below). What you see on the left-hand side of Figure 2 is the Mixer in Vegas 10; on the right-hand side here is the version in Vegas 11 that's called Master Bus. They look very similar, but there are a couple of differences worth pointing out.
Sony Vegas Pro
Figure 2. The old Mixer (left) and the new Master Bus (right side by side)
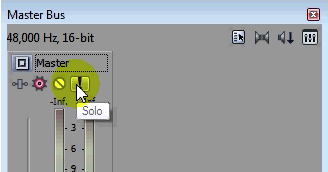
In Vegas 10 (left), you have the ability to insert a bus and to insert Assignable FX in this two-track Mixer. Sony has actually removed that from the Master Bus in Vegas 11. If you want that type of control, it's probably best to bring up the full Audio Mixer. We'll take a look at that here in just a moment. Other than that, there is no difference here between these two. You still have the ability to solo and mute your stereo channels here in Vegas 11's Master Bus (Figure 3, below).
Sony Vegas Pro
Figure 3. Soloing tracks in the Master Bus in Vegas Pro 11
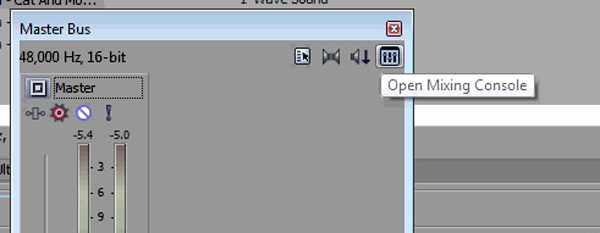
One difference in the Vegas 11 version is that you can open your Mixing Console directly from the Master Bus (Figure 4, below). You couldn't do that before.
Sony Vegas Pro
Figure 4. Opening the Mixing Console from the Master Bus in Vegas Pro 11
That kind of sums of the differences here between the two-track Mixers in Vegas 10 and Vegas 11. Let's have a look at the actual Mixing Console itself.


1


1

Using the Mixing Console

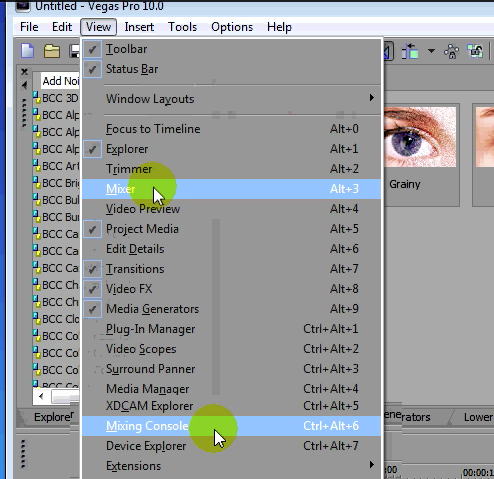
Notice that in Vegas 10, the previous version, that you could bring up the Mixer window or the Mixing Console window (Figure 5, below). That's a little bit confusing.
Sony Vegas Pro
Figure 5. Opening the Mixer window (or the Mixing Console window) in Vegas Pro 10 from the same View menu (note: composite image)
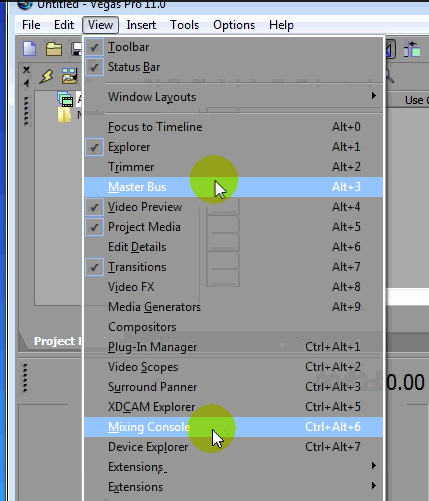
In Vegas 11, again, these features are much better differentiated in their naming: Master Bus and Mixing Console (Figure 6, below). And remember that if you're looking at the Master Bus you can open the Mixing Console right from the Bus.
Sony Vegas Pro
Figure 6. Opening the Mixer window (or the Mixing Console window) in Vegas Pro 11 from the same View menu (note: composite image)
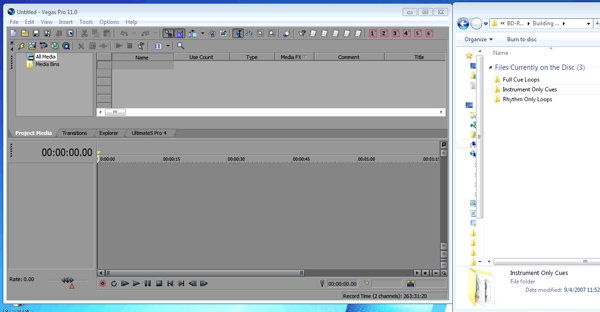
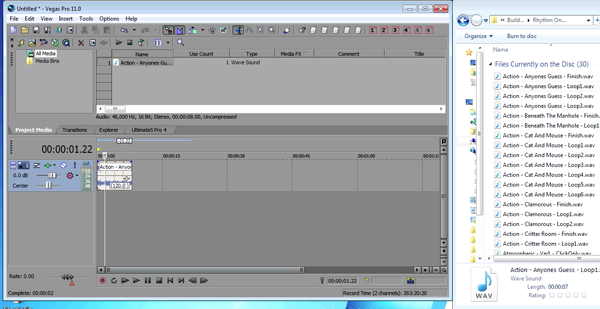
Figure 7 (below) shows a bit of a different preview of a Vegas project. This is Vegas 11. There's no video preview. We have just our workspace here. On the right side in Figure 7 we have a disc in the DVD drive from VASST called TrakPak 5: Modern Incidentals—Modern Scoring cues and Background Images.


Sony Vegas Pro
1

Building a Soundscape

We're going to set up a little soundscape here for our major motion picture. Just to give you an idea of how it is to work with audio in Vegas, these files that we're working with here are actually royalty-free loops and little instrumental pads and patches and things that you can use in your productions. You can get these from a variety of sources. We're using some from VASST for this demonstration.
Let's start with a rhythm loop. In Figure 8 (below) I'm grabbing a loop and setting it up in an audio track in the Vegas timeline.
Sony Vegas Pro
Figure 8. Adding some loops
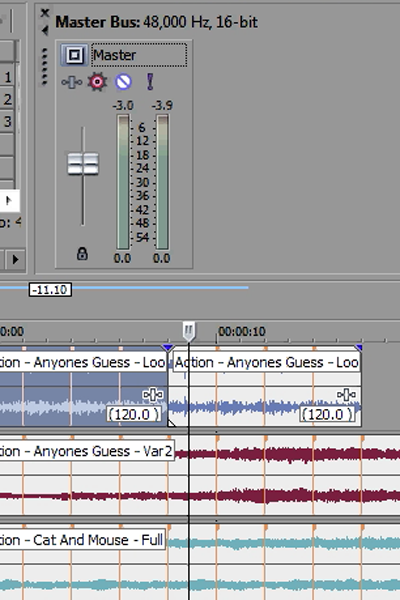
It's easy to loop this audio clip. First, you make a copy of it by pressing Control, then clicking and dragging it across the timeline. And since it's designed as a loop, then it should play seamlessly from one clip to the other.
Next I'll grab a couple of other pieces of media, like some instrumental cues, as shown in Figure 9 (below). I really have no idea how these sound, but the beauty thing about this is it doesn't really matter at this point. You can see how they'll fit together.
Sony Vegas Pro
Figure 9. Adding more media to the timeline.
I've also added the Master Bus (Figure 10, below), which is how most people would view their timeline.
Sony Vegas Pro
Figure 10. Using the Master Bus
What we have here is a track of rhythm instruments, and then two tracks of kind of instrumental music. This is the kind of standard master and Mixer view that we're used to seeing in Vegas when we're working on our video projects. But it's not the view that most audio engineers are used to looking at when they're dealing with multitrack mixers. So let's grab our Master Bus and click the open Mixing Console icon (Figure 11, below) and see what that looks like.
Sony Vegas Pro
Figure 11. Opening the Mixing Console from the Master Bus
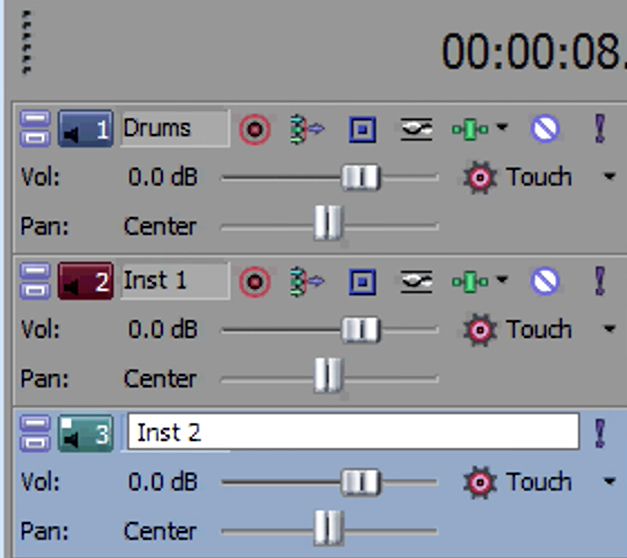
If we give our tracks names (Figure 12, below)...
Sony Vegas Pro
Figure 12. Naming the tracks
...we'll see the names that we've given them in the label on the bottom of each channel in the Mixing Console (Figure 13, below).
Sony Vegas Pro
Figure 13. Named tracks at the bottom of the Mixing Console

Exploring the Mixing Console

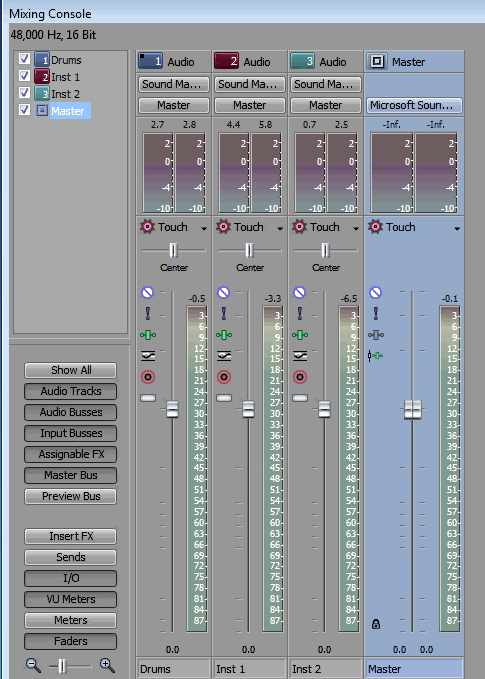
Let's take just a moment and poke around the Mixing Console (Figure 14, below) for a little bit.
Sony Vegas Pro
Figure 14. The Mixing Console
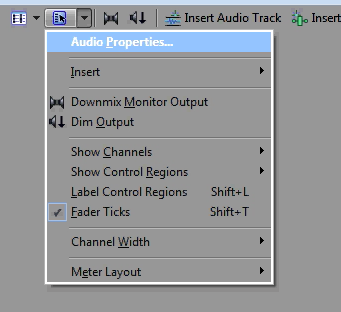
The Audio Properties (Figure 15, below) and layout are streamlined from previous versions.
Sony Vegas Pro
Figure 15. Audio Properties in the Mixing Console
All of our main controls are still across the top, as they have been in previous versions, in serving busses, Assignable FX, things like that.
You have a variety of ways that you can look at the levels of audio. You've got our old friend, the Master Bus, which you can bring right up (Figure 16, below).
Sony Vegas Pro
Figure 16. The Master Bus in the Mixing Console
You've also got VU meters. If you're used to working in any other digital audio workstation, you likely have a favorite way of viewing your workspace. And Vegas gives you all the flexibility to look at these levels any way you choose. Remember, Vegas started life as an audio workstation and it still has the best audio capabilities of any NLE on the market.
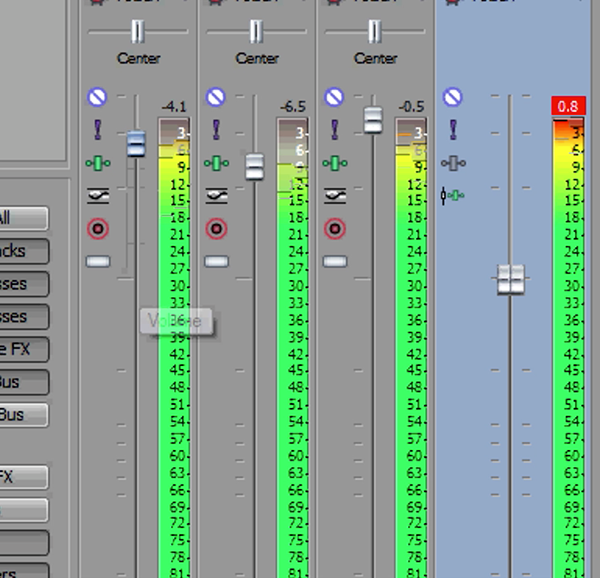
Play with the levels and experiment. Figure 17 (below) shows what's called "making everything louder than everything else." You'll notice that we're peaking in Figure 17. We're going above zero, which is always bad in digital audio. You never want to go above zero.
Sony Vegas Pro
Figure 17. Louder!
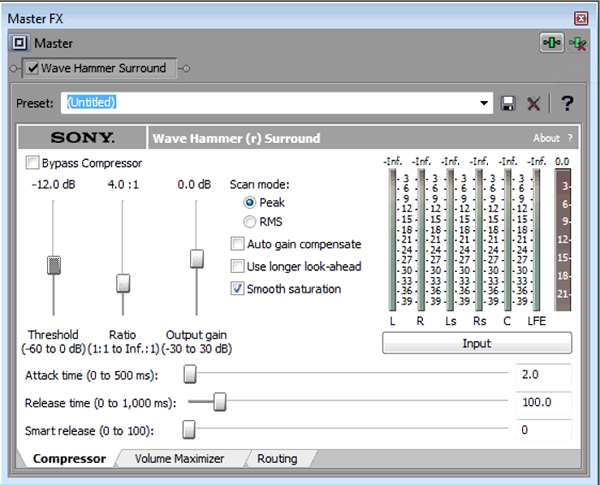
So to keep that from happening, I'm going to add a mastering plug-in called MasterFX (Figure 18, below). There are a number of controls you can adjust in this plug-in, but I pretty much leave this the way it is. And you'll notice that no matter how we have these levels set, which are just entirely too high, it won't go above zero. And remember that if you double-click on a control in Vegas, it takes it back to its default setting, and the levels in the Mixing Console are no different.
Sony Vegas Pro
Figure 18. The MasterFX plug-in
So again, you've got individual channel levels, you've got VU meters, you've got your master output. You can insert your effects on the individual tracks right from this view.
So the next time you have an audio-only project or a project that uses many different audio tracks-typically it would be multiple tracks of music, a few tracks of dialogue, some sound effects, maybe even room tone-you might find that you'd benefit greatly from using the full on Mixing Console view in Vegas Pro. Check it out. I do think you'll like it. That's all for this tutorial. Thanks for reading, and we'll see you next time in Vegas.

видео консультация Новое в Сони Vegas

Sony Vegas Pro 10 is here! After months of speculation about what would be in the latest full-step upgrade to Sony Creative Software's popular pro NLE, the new version has brought users new features and increased performance-without sacrificing stability. In this overview I'm going to cover many of these new features in Vegas Pro 10 that will be of benefit to event videographers; some of them may seem far-fetched, some of them may not be obvious, but they're all here for a reason.
We'll also lay the groundwork for the series of tutorial articles that will follow in my "Tips and Tricks" column, and the video tutorial series that will kick off this month on with a series of video tutorials (see videos at the start and end of this article). But first...
I'll Go Ahead and Say It
The perception of many ".0" releases of any software package invite cries of "Wait For the Service Pack!" Well, by the time the download link for this new release was live to the public, the version was already at 10.0a. This is an update to the planned release. Kudos to Sony Creative Software for continuing to test and improve up till the release date. In my opinion this is instrumental to the stability of Vegas Pro 10. If you're waiting for an update before you install it, fear not—it's already here.
DSLR Preview and Editing Improvements
First up on the feature list is improved performance for editing files from Canon DSLR cameras such as the 7D, T2i, or the new 60D. I'm told by Vegas product manager Matthew Brohn that this feature intended specifically for the H.264 format used by DSLRs, and provides upwards of a 300% improvement. I first tried it out on hardware that desperately needs to be upgraded to work with anything later than HDV: a 2.4GHz Intel Q6600 that plays back T2i footage, in Preview Auto, at about 5-7 frames per second (fps) under Vegas 9e. There's no way you could edit this natively, nor would you want to.
However, on the same hardware and OS, with Vegas Pro 10 32-bit, the same project file played back at full frame rate. It still had the occasional stutter, but it performed exactly as if I were editing HDV or Cineform intermediates. While I don't recommend using older hardware for editing DSLR footage-even with Vegas Pro 10-the comparison demonstrates that Sony's claims of 3X improvement do indeed pan out.
Moving our test over to a more modern system, in i7-950 processor running Windows 7 64-bit OS, the footage plays in real time even in Vegas Pro 9 (using Preview Auto). Making the test harder, I used three tracks of video with the first two composited at about 50% so that information from each track was visible in every frame. This test is indicative of a complex composite, and in Vegas 9 the video previewed at 1-4fps, while on the new Vegas Pro 10 it clocked in at a considerably more watchable 8-14fps. The takeaway here is that if you're editing footage from a Canon DSLR, this feature alone is enough to warrant the upgrade to Vegas 10.
Image Stabilization, Courtesy of...
A brand-new feature with Vegas Pro 10 is image stabilization, courtesy of proDAD, developer of the popular Mercalli stabilization plug-in. While the stand-alone Mercalli product has just been upgraded to 2.0, the engine included in Vegas 10 is based on enhanced version 1 technology. This stabilization capability first became available to Vegas users in the consumer-oriented Vegas Movie Studio. However, in Vegas Pro 10 you get more control over how your stabilization is applied. You can do more with it than just choose between presets.
Sony 
Vegas Pro 10
The proDAD-driven stabilization interface in Vegas Pro 10
Unlike filters and transitions, image stabilization is accessed by right-clicking individual clips. Since image stabilization creates new clips, realize that the exact clips to which you apply stabilization are the only media that will be affected. If you're in a workflow using proxy files, you will want to wait until you've switched to your master, render-ready clips before you apply stabilization (unlike other FX or filters). If you apply stabilization to your proxies and then shift gears to prep for your final media, you will lose your stabilized clips.
New MultiCam Features
Vegas Pro has had built-in multicam capabilites since version 8. We don't personally use this feature in our studio, as my wife, Christie, and I have grown accustomed to the multicam tool provided by the UltimateS Pro plug-in from VASST. UltimateS Pro and another widely used plug-in, Edward Troxel's Excalibur, have provided multicam capability to Vegas users in one form or another for years.
In looking at the updates that Sony has made to the built-in multicam for version 10 however, I found that they've added one important feature. Once your multicam track is built, you can now expand it back into individual tracks for further tweaking. You can even choose to keep the unused clips, and Vegas will mute those individual events that aren't being used.
Sony 
Vegas Pro 10
The updated Multicam interface in Vegas Pro 10
Vegas in the Third Dimension
This is where things get interesting. You can't walk into a multiplex movie theater these days without finding some Hollywood offering being shown in 3D. From animation to horror, it seems like everything short of romantic comedies is a candidate for 3D. Noted horror director Wes Craven, when speaking to the Los Angeles Times about his new film My Soul To Take, said this about 3D: "For me, it's an experiment ... If it does endure as a technical form of the art, then I'm learning at the ground floor like everybody else, and it's an important thing to do."
3D at the movie theater seems to be a natural, if for no other reason than to get people to the theaters to see movies in a way that we can't see it at home. It was only a matter of time, apparently, before the companies who exhibit at NAB, IBC, and other conferences decided that we all need to shoot, edit, deliver, and watch 3D at home.
Is it all just a fad? I don't know. While this article is not about 3D in general, let's look at some facts and statistics before dismissing altogether the concept of video production in 3D. To begin, most research that I've found projects sales of 3D TVs being slow in 2011, and picking up sharply after that. ABI Research predicts that 3D television in the home will begin to take off in 2013, with more than 50 million 3D TVs shipped worldwide in 2015 alone. While you can buy all the gear to produce 3D content now, most analysts predict that 3D in the home will be mainstream in 2-4 years. Is 3D a fit for wedding and event video? 3D could very well become as mainstream as HD is, and it's nice to know that you can start experimenting with the technology yourself, today, with very little investment. To pick up a 3D camera that's comparable to the prosumer models most non-DSLR videographers use, you'll need to shell out $22,000 for the likes of the Panasonic AG-3DA1 (or, better yet, rent it for the occasional 3D booking). That's a little steep for most of us, but Panasonic has a consumer model, the HDC-SDT750, with a street price of $1,400, and a company called Aiptek has introduced a Flip-like 3D cam with a street price of $200.
With Vegas Pro 10, you can edit footage from any of these cameras right away. The Stereoscopic 3D mode you want to work with is chosen in the Project Properties window. You have a variety of choices in monitoring 3D; you can view it from your PC display, and you can even use a 3D-capable HDTV via HDMI as your external monitor for a more accurate preview.
Sony 
Vegas Pro 10
Choosing project properties for 3D editing in Vegas Pro 10
GPU-Enhanced Rendering
While, traditionally, most of us have seen the ability to edit video in real time without specialized hardware as a plus, times do change. And Vegas Pro is changing with them. In another "first," for Vegas, version 10 has joined Adobe CS5 in adding GPU processing. In the past, the kind of video card you had in your editing system was never a concern with Vegas with the exception of DVI or HDMI output connectors. With this release of Vegas Pro you will now be able to take advantage of a CUDA-enabled GPU in a very specific application, which is rendering to the Sony AVC codec.
It's important to note that the GPU in Vegas Pro does not have any effect on editing performance in the timeline. This is Sony's cautious foray into the GPU arena, and I look forward to what other processes they can speed up by offloading them to the GPU.
Sony 
Vegas Pro 10
Choosing GPU rendering in Vegas Pro 10
Be careful about what video card you choose if you're upgrading your hardware. You may find that your CPU alone is faster than using the GPU. For example, in one of our new PC builds, the i7 950 processor alone proved faster than offloading to the NVIDIA GeForce GTS 450. In my test project, the CPU rendered the 30-second Vegas project (.veg) file in a little less than 30 seconds, while the GPU-only render took 35 seconds. Our next machine will have a better (and more expensive) video card with a higher CUDA count. I'm thankful that we didn't spend too much on the GTS 450 card, since we won't be using its CUDA capabilities.
OpenFX Plug-in Architecture
Vegas Pro 10 has a completely new plug-in architecture for effects and filters. This is exciting news, as editors and creative types will now have many more tools to play with. Any plug-in based on the Open Effects Association (OFX) standard is a candidate for use in Vegas Pro 10. The very high-end GenArts Sapphire and Monsters GT plug-ins work right out of the box with no alteration. BorisFX has also released Continuum Complete for Vegas 10. This is a midlevel-priced offering from BorisFX, and I hope to provide a thorough review of it in a future column.
Sony 
Vegas Pro 10
Applying the Pencil Sketch effect in BorisFX Continuum Complete for Vegas Pro 10
Plug-in manufacturers will need to do a minimal amount of work to update most of their OFX products to interface directly with Vegas under the OFX standard. For users of existing plug-ins, have no fear. Vegas is maintaining the legacy SDK-at least for this version. Your existing plug-ins will work, and a brave new world of Open Effects plug-ins awaits. More information about OFX is available at http://openeffects.org.
Other Goodies
There are many other updates and new features in Vegas Pro 10 that we'll be exploring in a new online tutorial series now underway on EventDV-TV (www.eventdv.tv). Among these is a welcome upgrade on the audio side, the ability to apply all of Vegas' audio effects at the event level. You've always been able to apply video filters and effects at the event level, but real-time audio effects were only available at the track level or in some cases the master bus output level. For the first time, Vegas allows you to insert up to 32 audio effects at the event level and preview them in real-time. This further solidifies Vegas Pro as the NLE with the most robust audio function support.
Also new in the audio department are track and VU meters. Track meters are great to have because so many of us work with multiple audio tracks, mixing them into final master output. Knowing at a glance which one of your tracks is causing the whole thing to clip is a wonderful new feature.
Sony 
Vegas Pro 10
Using track meters in Vegas Pro 10
Another enhancement is Track Grouping. With Track Grouping, you can now select several tracks and group them together, even hiding them out of your way. Being able to group events together has been a feature of Vegas forever, but just now are we able to group together tracks. You can group tracks, name the group, and choose to show or hide the group.
Sony 
Vegas Pro 10
Grouping tracks in Vegas Pro 10 and naming the group
DVD Architect gets a little love in this release (though not much) with the inclusion of new HD themes and the ability to use a Windows burning engine, thereby potentially supporting more and newer DVD and Blu-ray burners. You can choose at run time which method you prefer to use.

Sony Vegas Pro 10 Stabilization


I've been making the switch from Adobe Premiere Pro CS4 to Sony Vegas Pro 10. Up until buying an AVCHD camcorder two years ago I had been using Premiere exclusively. However, the lack of AVCHD in CS3 and the initial buggy AVCHD support in CS4 prompted me to look for alternatives.

I tried out the trial version of Vegas Pro and found that it was rock solid editing AVCHD, had great export options, and seemed more modern than CS3 or CS4 because of its 64bit architecture support. More recently Vegas has improved their GPU acceleration and the UI has become more polished.

Anyway, since I don't have all night to write this. I wanted to focus on the cool image stabilization feature that isn't included in CS4.

I had some old very shaky handheld footage I shot at a friends wedding using a Hi-8 camcorder.

I searched the internet to see if there was anything I could do to fix it.

Turns out that Vegas Pro has an amazing video stabilization feature. Basically, you just select a clip and tell the software what kind of shakiness you want to remove (horizontal, vertical, etc.).

I've included the shot I stabilized. It literally took just a few seconds to correct.

Even if you don't have old shaky video footage I still highly recommend you try out Sony Vegas Pro Trial.
уроки редактирования, медиа реклама, моушн графика, видеомонтаж, 3D графика, спецэффекты,пост обработка, постпродакшн, инфографика, обучение, видеоуроки, videoedittng, tutorial, video, graphics, CG, nix, studio, edition, game, video, clip, movie,сайт, о компьютерных видеороликах, видеомонтаже, графике, мувмейкинге, клипмодинге, обучалки, статьи, видеоигры,готовые работы для новечков,альфа канал